
User Manual

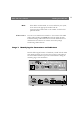
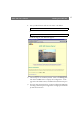
Table Of Contents
- Cover
- Section 1 Introduction
- Section 2 Installing the AXIS 240
- Section 3 Assigning an IP Address
- Section 4 Configuring the AXIS 240
- Section 5 Using the AXIS 240
- Appendix A Troubleshooting
- Appendix B The Parameter List
- Appendix C Updating the Software
- Appendix D Technical Specifications
- Appendix E The Auxiliary IO Port
- Appendix F The RS232 Serial Ports
- Appendix G Camera Applications
- Appendix H CRON Script Command Reference

Installing the AXIS 240 AXIS 240 Users Manual
16
Stage 4. Connecting the AXIS 240 to your Network
To connect your AXIS 240 to the network, follow these steps:
1. Connect your AXIS 240 to the network using an Ethernet 10baseT
connector.
2. Connect the power supply to the AXIS 240.
3. Check that the Power indicator is constantly lit.
Stage 5. Assigning an IP Address
To access the AXIS 240 from a Web browser, you must first assign
and download a valid IP address.
Refer to Section 3 - Assigning an IP Address on how to do this.
Stage 6. Verifying the Installation
After assigning a valid IP address, you are now ready to test the
connection between your AXIS 240 and the network.