
User Manual
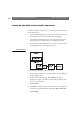
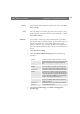
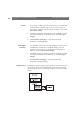


Table Of Contents
- Cover
- Section 1 Introduction
- Section 2 Installing the AXIS 240
- Section 3 Assigning an IP Address
- Section 4 Configuring the AXIS 240
- Section 5 Using the AXIS 240
- Appendix A Troubleshooting
- Appendix B The Parameter List
- Appendix C Updating the Software
- Appendix D Technical Specifications
- Appendix E The Auxiliary IO Port
- Appendix F The RS232 Serial Ports
- Appendix G Camera Applications
- Appendix H CRON Script Command Reference

Appendix F: The RS232 Serial Ports AXIS 240 Users Manual
100
Setting Up the AXIS 240 for Pan/Tilt Connection
The AXIS 240 allows various ways of controlling the camera position
via the Pan/Tilt port:
Connecting the AXIS 240 to a camera via a Pan/Tilt device, and
controlling the position from the Pan/Tilt control page
Connecting the AXIS 240 directly to a camera, and using CGI
parameters in a web application for controlling the position
Connecting the AXIS 240 directly to a camera, and using a TCP
client application for controlling the position
Pan/Tilt Device
To install a Pan/Tilt device, follow these steps:
1. Attach the Pan/Tilt device to the Pan/Tilt port of the AXIS 240
using an RS232 cable.
2. On the AXIS 240 Home Page, click Settings. You will be
prompted to supply a username and password. By default, these
are set to
root and pass.
3. Click Pan/Tilt.
4. Click Driver. Select the driver that corresponds to your Pan/Tilt
device from the pulldown menu. Click Store driver and restart.
5. Click Settings.