
System information


Manual:Grounding
101
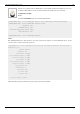
ESD Protection on RouterBOARD devices
1.1. Three arrows mark the grounding inside the ethernet port, the shielded cable connects it's shield to these two
grounding pins via the metallic ethernet connector.
2.2. The middle arrow points to the metal plate inside the port, which connects the grounding pins to the board. The
board needs to be grounded at the mounting hole (put grounding wire on the screw when you mount the board
inside a case). Any surges will go from the grounding pins, to the grounding plate, to the board, and then to the
grounding installation.
3.3. The two separate arrows show the ESD protection chips on the board - in case there was no shielded cable, to
protect the CPU and other parts of the board.
The protection is not too effective if you only use shielded cable, and don't ground the board itself. You need to do
both things to be successful. See below for possible methods, option 1 is recommended.
Grounding RouterBOARD installations
There are two methods, one of them more effective than the other.
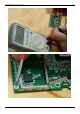
PoE with shielded connectors
1. Using a Shielded cable + Board is grounded: If you connect
grounding to the mounting point of the RB711 (or the mounting
loop inside SXT door), you don't necessary need to ground the
device at other end of the shielded cable. Just using a shielded cable
is enough. Special PoE is also not needed. This is the best option to
protect against all ESD damage.
2. Using only shielded cable: If you can't ground the
RB711/SXT/other device itself, you can ground the device on the
other end of your shielded cable (switch, router, etc). If you need to
use PoE, the injector with a metal shielding around connectors will
be required, because it allows shielded cable to be used. This
method is not recommended, better ground the board itself also
(option 1).