AXI03003 T1/T2 INSTRUCTION MANUAL BEDIENUNGSANLEITUNG MANUEL D’UTILISATION MANUALE DI ISTRUZIONI
EN NOTICE All instructions, warranties and other collateral documents are subject to change at the sole discretion of Horizon Hobby, LLC. For up-to-date product literature, visit horizonhobby.com or towerhobbies.com and click on the support or resources tab for this product.
EN TABLE OF CONTENTS Vehicle Maintenance ...................................................................................... 9 Spektrum Receiver/ESC Combo .................................................................. 10 Gear Ratios...................................................................................................... 10 Troubleshooting.............................................................................................. 11 Limited Warranty.....................................
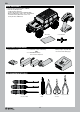
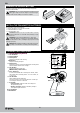
EN BOX CONTENTS • Spektrum™ DX3™ 2.
EN GETTING STARTED CHECKLIST Read the manual Power on the transmitter Familiarize yourself with the vehicle and its components Install the vehicle battery in the vehicle Check all screws, especially the driveshaft setscrews, for tightness from the factory Check for proper function of the throttle and steering Range check the radio system Charge the vehicle battery Drive the vehicle, challenge yourself and have FUN! Install 4 AA batteries in the transmitter Perform any necessary vehicle maintenance
EN CHARGE THE VEHICLE BATTERY Follow the manufacturer’s directions for your charger to properly charge the vehicle battery. CAUTION: Only use chargers designed to charge the chosen battery type. Using an incorrect charger or incorrect charger settings could cause the battery to catch fire or explode. INSTALL THE TRANSMITTER BATTERIES This transmitter requires 4 AA batteries. 1. Remove the battery cover from the transmitter. 2. Install the batteries as shown. 3. Install the battery cover.
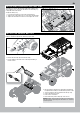
EN ADJUSTING THE VEHICLE BATTERY TRAY The battery trays may be adjusted to fit a wide range of battery sizes. The rear battery tray is shown in the illustration. The side battery tray is adjustable in the same manner. To adjust the battery tray: 1. Loosen the four flathead screws shown in the illustration. 2. Slide the ends of the battery tray in or out to fit the desired battery. 3. Tighten the four flathead screws. Do not over-tighten the screws.
EN BINDING Binding is the process of programming the receiver to recognize the GUID (Globally Unique Identifier) code of a single specific transmitter. The transmitter and receiver are bound at the factory. If you need to rebind, follow the instructions below. 1. Connect a fully charged battery pack to the ESC/receiver. 2. Disconnect the “Dig” servo lead from the receiver. 3. Press and hold the bind button on the receiver. 4. Power ON the receiver. The red LED flashes, indicating the receiver is in bind mode.
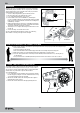
EN VEHICLE MAINTENANCE Just like a full size car or truck your RC vehicle must undergo periodic maintenance in order to ensure peak performance. Preventative maintenance will also help avoid needless breakages which could result in costly repairs. Below are some suggestions to properly maintain your vehicle.
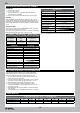
EN SPEKTRUM RECEIVER/ESC COMBO OPERATION 1. Power on the transmitter. 2. Power on the receiver. 3. The green LED on the receiver will be illuminated when it is connected to your transmitter. 4. Disconnect the battery from the ESC/Receiver after operation. SPECIFICATIONS Waterproof DSMR ESC/Receiver Type 2-in-1 with SMART Telemetry Dimensions (L × W × H) 54mm × 33.5mm × 20.
EN TROUBLESHOOTING PROBLEM The system will not connect The receiver goes into failsafe a short distance away from the transmitter The receiver stops responding during operation POSSIBLE CAUSE Your transmitter and receiver are too close together You are near metal objects The receiver is bound to a different model memory Your transmitter was placed into bind mode and is no longer bound to your receiver Check for damage on the receiver antenna Low receiver battery voltage.
EN LIMITED WARRANTY What this Warranty Covers Horizon Hobby, LLC, (Horizon) warrants to the original purchaser that the product purchased (the “Product”) will be free from defects in materials and workmanship for a period of 2 years from the date of purchase.
EN FCC INFORMATION Contains FCC ID: BRWKATY1T This device complies with part 15 of the FCC rules. Operation is subject to the following two conditions: (1) This device may not cause harmful interference, and (2) this device must accept any interference received, including interference that may cause undesired operation. CAUTION: Changes or modifications not expressly approved by the party responsible for compliance could void the user’s authority to operate the equipment.
DE HINWIES Allen Anweisungen, Garantien und anderen zugehörigen Dokumenten sind Änderungen nach Ermessen von Horizon Hobby, LLC vorbehalten. Aktuelle Produktliteratur fi nden Sie unter www.horizonhobby.com oder www.towerhobbies.com im Support-Abschnitt für das Produkt.
DE INHALTSVERZEICHNIS Wassergeschütztes Fahrzeug mit wasserdichter Elektronik ................. 15 Packungsinhalt ............................................................................................... 16 Erforderliches Zubehör ................................................................................. 16 Empfohlene Werkzeuge ................................................................................ 16 Erste-Schritte-Checkliste ...........................................................
DE PACKUNGSINHALT • Spektrum DX3 2,4-GHz-Sender (SPM2340) • SCX10 III Jeep Wrangler RTR - 35T Elektromotor (AX31312) - Spektrum Empfänger/GeschwindigkeitsreglerKombination (SPMXSE1040RX) - Wasserdichter Metallgetriebe-Oberflächenservo, 23T (SPMS614) - SX107 Analoger Micro-MetallgetriebeOberflächenservo (Für Grabfunktion) (SPMSSX107) • Teilebeutel • Kreuzschlitzschlüssel ERFORDERLICHES ZUBEHÖR • (4) AA-Alkali-Batterien • 2–3S Standard- oder „Shorty“-LiPo-Akku ODER • Akkuladegerät kompatibel mit dem gewä
DE ERSTE-SCHRITTE-CHECKLISTE Lesen Sie das Handbuch Die Akkus in das Fahrzeug einsetzen Machen Sie sich mit dem Fahrzeug und seinen Komponenten vertraut Überprüfen der ordnungsgemäßen Funktion der Gaszufuhr und der Lenkung Alle Schrauben, insbesondere die Feststellschrauben der Antriebswelle, werksseitig auf festen Sitz prüfen Reichweitentest für das Funksystem durchführen Laden des Fahrzeug-Akkus Fahren Sie das Fahrzeug, fordern Sie sich selbst heraus und genießen Sie es! Die 4 AA-Batterien in den
DE LADEN DES FAHRZEUG-AKKUS Befolgen Sie die Anweisungen des Herstellers Ihres Ladegeräts, um den Fahrzeug-Akku ordnungsgemäß zu laden. ACHTUNG: Verwenden Sie nur Ladegeräte, die für das Laden des gewählten Akkutyps ausgelegt sind. Die Verwendung eines falschen Ladegeräts oder eine falsche Ladeeinstellung kann dazu führen, dass der Akku brennt oder explodiert. EINSETZEN DER SENDERBATTEREIEN Für den Betrieb sind 4 AA Batterien erforderlich. 1. Nehmen Sie die Batterieklappe vom Sender ab. 2.
DE ANPASSEN DES AKKUFACHS DES FAHRZEUGS Die Akkufächer können zur Aufnahme einer großen Bandbreite an Akkugrößen angepasst werden. Das hintere Akkufach wird in der Abbildung dargestellt. Das seitliche Akkufach kann in gleicher Weise angepasst werden. Zum Anpassen des Akkufachs: 1. Die vier in der Abbildung dargestellten Flachkopfschrauben lösen. 2. Die Enden des Akkufachs hinein oder herausschieben, damit der gewünschte Akku passt. 3. Die vier Flachkopfschrauben festziehen.
DE BINDEN Das Binden ist der Vorgang, durch den der Empfänger darauf programmiert wird, den GUID-Code (Globally Unique Identifier) eines einzelnen Senders zu erkennen. Der Sender und der Empfänger sind werksseitig gebunden. Muss eine erneute Bindung durchgeführt werden, so ist die nachfolgende Anleitung zu befolgen. 1. Ein voll aufgeladenes Akkupack mit dem Geschwindigkeitsregler/ Empfänger verbinden. 2. Die „Dig“-Servoleitung vom Empfänger trennen. 3. Den Bindungsschalter am Sender gedrückt halten. 4.
DE FAHRZEUGWARTUNG Genau wie bei einem richtigen Auto oder LKW muss Ihr RC-Fahrzeug regelmäßig gewartet werden, um eine hohe Leistungsfähigkeit zu gewährleisten. Vorbeugende Wartung hilft auch, unnötige Ausfälle zu vermeiden, die zu kostspieligen Reparaturen führen können. Nachfolgend finden Sie einige Vorschläge zur ordnungsgemäßen Wartung Ihres Fahrzeugs.
DE SPEKTRUM EMPFÄNGER/GESCHWINDIGKEITSREGLER-KOMBINATION BETRIEB 1. Den Sender einschalten. 2. Den Empfänger einschalten. 3. Die grüne LED auf dem Empfänger leuchtet auf, wenn er mit dem Sender verbunden ist. 4. Nach dem Betrieb den Akku vom Geschwindigkeitsregler/ Empfänger trennen.
DE PROBLEMLÖSUNG PROBLEM Das System verbindet sich nicht MÖGLICHE URSACHE Der Sender und der Empfänger sind zu nah aneinander Sie sind in der Nähe von Metallobjekten Der Empfänger ist an einen anderen Modellspeicher gebunden Der Sender wurde in den Bindungsmodus versetzt und ist nicht länger mit dem Empfänger gebunden Der Empfänger schaltet sich in Failsafe, Auf Schäden an der Empfängerantenne obwohl er sich in geringer Entfernung zum prüfen Sender befindet Niedrige Empfänger-Akkuspannung.
DE EINGESCHRÄNKTE GARANTIE Warnung Ein ferngesteuertes Modell ist kein Spielzeug. Es kann, wenn es falsch eingesetzt wird, zu erheblichen Verletzungen bei Lebewesen und Beschädigungen an Sachgütern führen. Betreiben Sie Ihr RC-Modell nur auf freien Plätzen und beachten Sie alle Hinweise der Bedienungsanleitung des Modells wie auch der Fernsteuerung. Garantiezeitraum Exklusive Garantie Horizon Hobby LLC (Horizon) garantiert, dass dasgekaufte Produkt frei von Material- und Montagefehlern ist.
DE KONFORMITÄTSHINWEISE FÜR DIE EUROPÄISCHE UNION EU KONFORMITÄTSERKLÄRUNG Axial SCX10 III Jeep Wrangler (AXI03003) Horizon LLC erklärt hiermit, dass dieses Produkt konform zu den essentiellen Anforderungen der RED und EMC Direktive ist. Eine Kopie der Konformitätserklärung ist online unter folgender Adresse verfügbar : http://www.horizonhobby.com/content/support-render-compliance.
FR REMARQUE Toutes les instructions, garanties et autres documents de garantie sont sujets à la seule discrétion de Horizon Hobby, LLC. Veuillez, pour une littérature produits bien à jour, visiter www.horizonhobby.com ou www.towerhobbies.com et cliquer sur l’onglet de support de ce produit.
FR TABLE DES MATIÈRES Véhicule étanche avec composants électroniques étanches ............... 27 Contenu de la boîte ........................................................................................ 28 Matériel nécessaire ...................................................................................... 28 Outils recommandés...................................................................................... 28 Liste de contrôle avant de commencer ...............................................
FR CONTENU DE LA BOÎTE • Émetteur 2,4 GHz DX3 Spektrum (SPM2340) • RTR Jeep Wrangler SCX10 III - Moteur électrique 35T (AX31312) - Combinaison récepteur/ESC Spektrum (SPMXSE1040RX) - Servo de surface à engrenage métallique étanche, 23T (SPMS614) - Micro servo de surface à engrenage métallique analogique SX107 (pour la fonction Dig) (SPMSSX107) • Sachet de pièces • Clé cruciforme MATÉRIEL NÉCESSAIRE • (4) piles alcalines AA • Batterie LiPo shorty ou standard 2-3S • Chargeur de batterie compatible avec
FR LISTE DE CONTRÔLE AVANT DE COMMENCER Lisez le manuel Mettez l’émetteur en marche Familiarisez-vous avec le véhicule et ses composants Installez la batterie du véhicule dans le véhicule Vérifiez que toutes les vis, en particulier les vis de fixation de l’arbre de transmission, ont été bien serrées en usine Contrôlez le bon fonctionnement des gaz et de la direction Vérifiez la portée de votre système radio Chargez la batterie du véhicule Manœuvrez le véhicule, mettez-vous au défi, et AMUSEZ-VOUS ! Ins
FR CHARGEZ LA BATTERIE DU VÉHICULE Suivez les instructions du fabricant de votre chargeur pour charger correctement la batterie du véhicule. ATTENTION : Utilisez uniquement des chargeurs conçus pour charger le type de batterie choisi. L’utilisation d’un chargeur incompatible ou de paramètres de chargeur inadaptés peut entraîner un incendie ou une explosion de la batterie. INSTALLATION DES PILES DE L’ÉMETTEUR Cet émetteur nécessite 4 piles AA. 1. Retirez le couvercle du compartiment à piles. 2.
FR AJUSTEMENT DU SUPPORT DE BATTERIE DU VÉHICULE Les supports de batterie peuvent être adaptés à une grande variété de tailles de batterie. L’illustration montre le support de batterie arrière. Le support de batterie latéral s’ajuste de la même manière. Pour ajuster le support de batterie : 1. Desserrez les quatre vis à tête plate montrées dans l’illustration. 2. Faites glisser les extrémités du support de batterie vers l’intérieur ou l’extérieur afin de l’adapter à la batterie souhaitée. 3.
FR AFFECTATION DE VOTRE ÉMETTEUR ET VOTRE RÉCEPTEUR L’affectation est le processus de programmation du récepteur qui vise à reconnaître le code GUID (identificateur global unique) d’un émetteur unique spécifique. L’émetteur et le récepteur sont affectés en usine. Si vous devez les réaffecter, suivez les instructions ci-dessous. 1. Branchez une batterie complètement chargée sur le variateur ESC/récepteur. 2. Débranchez le fil du servo Dig du récepteur. 3.
FR ENTRETIEN DU VÉHICULE Tout comme une voiture ou un camion grandeur nature, votre véhicule télécommandé doit être entretenu régulièrement pour conserver une performance optimale. L’entretien préventif permet également d’éviter toute casse superflue pouvant entraîner des réparations coûteuses. Voici ci-dessous quelques suggestions pour entretenir correctement votre véhicule.
FR COMBINAISON RÉCEPTEUR/ESC SPEKTRUM FONCTIONNEMENT 1. Allumez l’émetteur. 2. Allumez le récepteur. 3. La DEL verte sur le récepteur s’allume lorsque celui-ci est connecté à l’émetteur. 4. Débranchez la batterie du variateur ESC/récepteur après l'utilisation.
FR GUIDE DE DÉPANNAGE PROBLÈME Le système ne se connecte pas Le récepteur passe en mode sécurité intégrée à une courte distance de l’émetteur CAUSE POSSIBLE L’émetteur et le récepteur sont trop proches Vous vous trouvez à proximité d’objets métalliques Le récepteur est affecté à la mémoire d’un modèle différent Votre émetteur a été placé en mode affectation et n’est plus affecté à votre récepteur Vérifiez que l’antenne du récepteur n’est pas endommagée Faible tension de la batterie du récepteur.
FR GARANTIE ET RÉPARATIONS Durée de la garantie Garantie exclusive - Horizon Hobby, LLC (Horizon) garantit que le Produit acheté (le « Produit ») sera exempt de défauts matériels et de fabrication à sa date d’achat par l’Acheteur. La durée de garantie correspond aux dispositions légales du pays dans lequel le produit a été acquis. La durée de garantie est de 6 mois et la durée d’obligation de garantie de 18 mois à l’expiration de la période de garantie.
FR INFORMATION IC CAN ICES-3 (B)/NMB-3(B) IC: 6157A-KATY1T Le présent appareil est conforme aux CNR d’Industrie Canada applicables aux appareils radio exempts de licence. L’exploitation est autorisée aux deux conditions suivantes : (1) l’appareil ne doit pas produire de brouillage, et (2) l’utilisateur de l’appareil doit accepter tout brouillage radioélectrique subi, même si le brouillage est susceptible d’en compromettre le fonctionnement.
IT AVVISO Tutte le istruzioni, le garanzie e gli altri documenti pertinenti sono soggetti a cambiamenti a totale discrezione di Horizon Hobby, LLC. Per una documentazione aggiornata sul prodotto, visitare il sito horizonhobby.com o towerhobbies.com e fare clic sulla sezione Support del prodotto.
IT INDICE Veicolo resistente all’acqua con elettronica impermeabile ................... 39 Contenuto della scatola ................................................................................ 40 Apparecchiature necessarie ....................................................................... 40 Strumenti consigliati...................................................................................... 40 Lista di controllo pre-utilizzo ...................................................................
IT CONTENUTO DELLA SCATOLA • Trasmittente Spektrum DX3 2,4 GHz (SPM2340) • SCX10 III Jeep Wrangler RTR - Motore elettrico 35T (AX31312) - Combo Ricevitore/ESC Spektrum (SPMXSE1040RX) - Servo per modelli di superficie, ingr. metallo, a prova d’acqua, 23T (SPMS614) - Micro servo analogico, modelli di superficie, ingr.
IT LISTA DI CONTROLLO PRE-UTILIZZO Leggere il manuale Installare la batteria del veicolo nel modello Acquisire familiarità con il veicolo e i suoi componenti Verificare il corretto funzionamento dell’acceleratore e dello sterzo Verificare che tutte le viti, in particolare le viti di fissaggio dell’albero di trasmissione, siano state ben serrate in fabbrica Provare la portata del radiocomando Caricare la batteria del veicolo Ora è possibile pilotare il veicolo e mettersi alla prova: BUON DIVERTIMENTO!
IT CARICARE LA BATTERIA DEL VEICOLO Seguire le istruzioni del produttore affinché il caricabatterie carichi correttamente la batteria del veicolo. ATTENZIONE: utilizzare esclusivamente caricabatterie progettati per la ricarica del tipo di batteria scelto. Utilizzando un caricabatterie errato o con impostazioni inadeguate, la batteria potrebbe prendere fuoco o esplodere. INSTALLARE LE BATTERIE DEL TRASMETTITORE Per questo trasmettitore servono 4 pile AA. 1.
IT REGOLAZIONE DEL PORTA BATTERIA DEL MODELLO I porta batteria sono regolabili per adattarli a batterie di dimensioni differenti. Il porta batteria posteriore è mostrato nell’illustrazione. Il porta batteria laterale è regolabile alla stessa maniera. Per regolare il porta batteria: 1. Allentare le quattro viti a testa piatta mostrate nell’illustrazione. 2. Far scorrere le estremità del porta batteria dentro o fuori come richiesto dalla batteria. 3. Serrare le quattro viti a testa piatta.
IT CONNESSIONE (BINDING) Il binding è la procedura di programmazione con la quale il ricevitore impara a riconoscere il codice identificativo universalmente univoco GUID (Globally Unique Identifier) della trasmittente cui viene associato. Trasmittente e ricevitore sono connessi in fabbrica. Se è necessario ripetere il binding, seguire le istruzioni riportate di seguito. 1. Collegare una batteria completamente carico all’ESC/ricevitore. 2. Scollegare il cavo del servo “DIG” dal ricevitore. 3.
IT MANUTENZIONE DEL VEICOLO Proprio come una macchina o un pick-up a grandezza naturale, il modello RC deve essere sottoposto a regolare manutenzione per garantire prestazioni ottimali. La manutenzione preventiva consente anche di evitare inutili rotture dei componenti che potrebbero richiedere riparazioni costose. Di seguito vengono forniti alcuni suggerimenti per una manutenzione adeguata del veicolo.
IT COMBO RICEVITORE/ESC SPEKTRUM UTILIZZO 1. Accendere la trasmittente. 2. Accendere il ricevitore. 3. La spia LED verde sul ricevitore rimane accesa una volta completato il binding tra ricevitore e trasmittente. 4. Scollegare la batteria dall’ESC/Ricevitore quando il modello non è in uso.
IT GUIDA ALLA RISOLUZIONE DEI PROBLEMI PROBLEMA Il sistema non si collega POSSIBILE CAUSA Trasmittente e ricevitore sono troppo vicini tra loro Si è in prossimità di oggetti metallici Ricevitore associato a un diverso modello di memoria La trasmittente è stata impostata in modalità di binding e non è più associata al ricevitore SOLUZIONE Spostare la trasmittente a 2,5-4 m dal ricevitore Allontanarsi dagli oggetti metallici Assicurarsi che nella trasmittente sia attivo il modello di memoria corretto Ripe
IT GARANZIA Periodo di garanzia Garanzia esclusiva - Horizon Hobby, LLC (Horizon) garantisce che il prodotto acquistato (il “Prodotto”) sarà privo di difetti relativi ai materiali e di eventuali errori di montaggio alla data di acquisto. Il periodo di garanzia è conforme alle disposizioni legali del paese nel quale il prodotto è stato acquistato. Tale periodo di garanzia ammonta a 6 mesi e si estende ad altri 18 mesi dopo tale termine.
IT DICHIARAZIONE DI CONFORMITÀ PER L’UNIONE EUROPEA DICHIARAZIONE DI CONFORMITÀ UE: Axial SCX10 III Jeep Wrangler (AXI03003) Horizon Hobby, LLC dichiara che il presente prodotto è conforme ai requisiti essenziali e ad altre disposizioni rilevanti delle direttive RED e EMC. Una copia della dichiarazione di conformità UE è disponibile online all’indirizzo: http://www.horizonhobby.com/content/support-render-compliance.
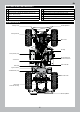
EXPLODED VIEWS // EXPLOSIONSZEICHNUNGEN // VUES ÉCLATÉES // VISTE ESPLOSE FRONT AXLE VORDERACHSE ESSIEU AVANT ASSALE ANTERIORE AXI234012 AXI235109 AXI234004 AXA120 AXI234010 AXI234006 AXI234006 AXI234004 AXI234004 AXI234004 AXI234006 AXI234013 AXI234004 AXI232017 AX31028 AXI234013 AX31148 AXI234006 AXI235109 AXI234004 AXA1230 AXI234008 AXI234006 AX31403 AXA120 AXI234004 AXI234003 AXI232006 AXI232017 AXA144 AXA144 AXA1221 AXI232027 AX30165 AX31028 AXA0286 AXI234004 AX31403 AXI234
REAR AXLE HINTERACHSE ESSIEU ARRIÈRE ASSALE POSTERIORE AXI232007 AXI232026 AXI232028 AX31406 AXI232002 AXI232008 AX31065 AX31074 AXA1221 AXI235014 AXA1221 AXI232003 AXA1221 AX31006 AX31406 AXI232023 AXI232018 AXI237009 AXI235016 AX31028 AXI234003 AX31148 AXA1221 AX31065 AXI232017 AXI234004 AXA144 AXI232028 AXA0286 AXA1221 AXI232007 AXI232017 AXA144 AXI232008 AXI237009 AXI234003 AXI232018 AXI232023 AXA0286 AXI235014 AXA120 AXI234004 AX31148 AX31028 AXI234004 AXI232017 AXI234006 AXI2
TRANSMISSION GETRIEBE TRANSMISSION TRASMISSIONE AXA0109 AXA291 AXI232029 AXA0109 AXA140 AX30569 AXI232030 AXI235178 AXI235178 AXI232029 AX31312 AXI235102 AXA1221 AXA1391 AXA149 AXI232036 AXA1392 AXI232037 AXI232035 AXI232035 AXI232031 AXI232035 AXA1392 AXI232036 AXI232029 AXI235178 AXI232036 AXA1391 AXA1221 AXI232031 AXA1221 AXI232029 AXI232029 AXI236173 AXA146 AXI237007 AXI232033 AXA1221 AXI232032 AXA1218 AXI232035 AXA149 AXI235178 AXI232032 AXI232035 AXA1221 AXI232031 AXA1218 A
CHASSIS KAROSSERIE CHÂSSIS TELAIO AXA144 AXA119 AXI231017 AXI231008 AXA146 AXA146 AXI231016 AXI231015 AXA149 AXI231021 AXI231017 AX31185 AXA115 AXA114 AXI231009 AXI231016 AXI231014 AXA118 AXA118 AXA0109 AXA115 AXA115 AXA114 AXI231009 AXA114 AXA119 AXI231009 TACM0245 AXI231012 AXA115 AXI231011 AXI235109 AXI231010 AX31185 AXI231017 AXI231015 AXA146 AXA118 AXI231011 AXA118 AXI231016 AXA146 AXI231017 AXA144 AXI235109 AXI231016 AXA146 AX31185 53 AXA146
CHASSIS KAROSSERIE CHÂSSIS TELAIO SPMSSX107 AXI232036 AXA013 AXA114 AXI230019 AXI235166 AXA116 AXI231019 AXI235169 AXA114 SPMXSE1040RX AXI230018 AXI231020 AXA116 AXI231014 AXA144 AXA0286 AXA0109 AXI235167 AXA013 AXA114 AXI230019 AXI231019 AXA114 AXI231008 AXA013 AXA0286 AXI231018 AXA0109 AXI231019 AXA116 AXA114 AXA0109 AXA144 AXI235166 AXI230019 54
BODY ASSEMBLY KAROSSERIEMONTAGE ENSEMBLE DE CARROSSERIE GRUPPO CARROZZERIA AXI230022 AXI235097 AXI230022 AXI235007 AXI235167 AXI235178 AXA013 AXI230022 AXI235178 AXI230023 AXI233023 AXI233003 AX31374 AXI233024 AXI235169 AXI235178 AXI235007 AXI233023 AXA013 AX31374 AXI230021 AXI230020 AX31374 AXI230024 AXI230022 AXI230022 AXI233003 AX31374 AXI235167 AXI230022 AXI235169 AXI235169 AXI230021 AXI235169 AXI31374 AXI230022 AXI233003 AXI223167 AXI230022 AX31374 AXI235167 AXI230020 AXA013 A
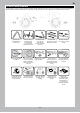
WHEELS AND TIRES REIFEN UND RÄDER ROUES ET PNEUS RUOTE E PNEUMATICI AXA1059 AXA1059 AXA1059 AXI236172 AXA232018 AXA115 AXI43009 AXI43010 AXA1059 SHOCK ABSORBERS STOSSDÄMPFER AMORTISSEURS AMMORTIZZATORI AXI233002 AXI235094 AXI43009 AXI233003 AX31250 AXI233002 AXI43009 AXI233011 AX1392 AXI233002 AXI25099 AXI233002 AXI233012 AXI233002 AXI233017 - Rear AXI233015 - Front AXI233003 56
PARTS LISTS // TEILELISTEN // LISTE DES PIÈCES // ELENCO COMPONENTI Part # Description AX30165 AX30569 AX31028 2.
Part # AXI230020 AXI230021 AXI230022 AXI230023 AXI230024 Description Beschreibung Description Kühler und vorderer Kotflügel Jeep Radiator & Front Fenders Jeep JLU JLU Rear Fenders Jeep JLU Hinterer Kotflügel Jeep JLU Teile Außenausstattung Karosserie Exterior Body Detail Parts Jeep JLU Jeep JLU Hinterer Gehäusehalterungssatz Body Mount Set Rear Jeep JLU Jeep JLU Jeep JLU Bremslichtlinse und Jeep JLU Brake Light Lens & Bucket Balken AXI230025 Universal Body Post Set Universal-Gehäusestangensatz AXI2310
Part # AXI233003 AXI233011 AXI233012 AXI233013 AXI233014 AXI233015 AXI233016 AXI233017 AXI233018 AXI234003 AXI234004 AXI234006 AXI234010 AXI234011 Description Beschreibung Description O-Ring-Satz für den Stoßdämpfer: Shock O-Ring Set: Capra UTB Threaded Shock Body Alum HA 11 x Gewinde-Stoßdämpfergehäuse 38mm (2pc) Alum HA 11 x 38 mm (2 Stk) Stoßdämpferkolbenstange M3 x Shock Shaft M3 x 50mm (2pc) 50mm (2) Spring 13 x 62mm .
OPTIONAL PARTS // OPTIONALE TEILE // PIÈCES FACULTATIVES // PARTI OPZIONALI Part # Description Beschreibung Description Jeep JL Allrad Wrangler-Karosserie (Farblos) Jeep JLU Innenraum (Farblos) Universal-Gehäusestangensatz: SCX10 III AXI230015 Jeep JL 4dr Wrnglr Body (Clr) AXI230016 Jeep JL Interior (Clear) AXI230025 Uni Body Post Set: SCX10 III AXI231013 Servo Horn, Metal 25T: SCX10III Servohorn, Metall 25T: SCX10III AXI231018 Receiver Box: SCX10III Empfängerbox: SCX10III Carrosserie Wrang
OFFICIALLY LICENSED BY: AXI03003 T1/T2 facebook.com/axialinc | instagram.com/axialracing | twitter.com/axialrc youtube.com/axialvideos | flickr.com/axialrc ©2020 Horizon Hobby, LLC. Axial, the Axial logo, DSM, DX3, IC3 and the Horizon Hobby logo are trademarks or registered trademarks of Horizon Hobby, LLC. The Spektrum trademark is used with permission of Bachmann Industries, Inc.