
User`s guide


4: Setup and Conguration • 24
©2014 Axia Audio - Rev.1.3.8
This will commit Bank 1 to Bank 0 and Bank 1 would
be available for a new upload.
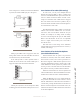
Factory Reset (rackmount + Desktop)
Rackmounts and Desktop models provide an option
to reset back to factory default. This is done by remov-
ing power from the unit. Locate the ID button on the
back panel. Press and hold the button while power is ap-
plied to the unit. Keep pressing the button for about 10
seconds. OLED models will provide a reset count down
time on the display. Filmcap models will ash the but-
tons several times and then stop.
Display Tests (rackmount + Desktop)
The intercom stations have a test mode that tests the
displays, buttons and provides an option to adjust the
brightness. With power applied, press and hold the ID
button for 10 seconds.
When in test mode, the four status LEDs (NET,
SYNC, Livewire, Master) will scroll in sequence. OLED
displays will show TEST. Pressing a button will illu-
minate the LED associated with the button. Pressing a
button on lmcap models will engage the LED for the
button. Each additional press will change the color of
the light (Green, Red, Yellow, none). Rotatingte encod-
ers on OLED models will display numerical values on
the OLED. For lmcap models, the buttons should be il-
luminated and rotating the knob will change the bright-
ness of the buttons.
Exit test mode is done so by pressing the ID button
once on the rear panel.
Console modules can be tested by accessing the un-
derside of the module and rotating a 16 position switch
to the F position.