
User`s guide


4: Setup and Conguration • 13
©2014 Axia Audio - Rev.1.3.8
Chapter Four:
Setup and Configuration
The different intercom stations reside in different
environments and thus some conguration will differ
based on those environments. For example, Element in-
tercom modules are resident in the Element and DSP en-
gine and take the properties from the host device. Simi-
lar, the softcom will take properties from the PC that the
software is running. The rackmount and desktop units
are independent devices that have a need for some con-
guration which is not needed for other types of stations.
This chapter will provide setup information and in some
cases the information will be specic to some stations
while not others.
Assigning an IP Address
Rackmount and desktop stations require the assign-
ment of an IP address. This is a simple rst step to set-
ting up an intercom station that only needs to happen
once per station. Each station has an ID button at the
back panel and pressing the button will issue a bootstrap
(BOOTP) request and change the front panel interface
of some models. The rackmount and desktop stations
can be differentiated by those that have OLED displays
or lmcap buttons. With OLED models, pressing the ID
button will change the front panel display and provide
values for each octet of the IP address per OLED screen
as seen in gure 4-1.
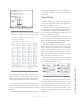
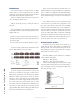
Figure 4-1: IC.20 Front Panel IP Address
Displays BootP Server
• Use the Mic and Spkr buttons above the display to
adjust value.
• Press the Mic or Spkr button below the rst display
to select either IP address of subnet mask.
• Press the Mic or Spkr buttons below the 4th display
to save or cancel changes.
For stations with lmcap buttons, pressing the ID
button will not change the front panel interface.
All rackmount and desktop models will issue a bootp
request when the ID button is pressed. With the use of a
simple bootp server application or iProbe, the broadcast
message sent by the station will be recorded and provide
an option by the application to congure the IP address
of the device.
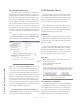
Bootps.exe
Bootps.exe is a simple DOS application that is avail-
able from the Axia audio website support and software
download section. This may be used to congure the IP
address of your intercom stations.
• Run the bootps.exe application
• Press the ID button, you will get a response similar
to:
bootps received request from 00:50:C2:80:32:0F
bootps new IP address: [0.0.0.0]
• Enter in the desired IP address for the device and
press enter.
If you are having trouble, check rewall settings of
the PC you are using. In some cases where there are mul-
tiple network cards installed, you may need to dene the
interface to be used:
>bootps.exe –i 192.168.2.89
You may also try to force the issue with the –set option:
>bootps.exe –i 192.168.2.89 –set 00:
50:C2:80:32:0F/192.168.2.100
For more information on the bootps application,
type bootps.exe –help.
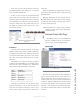
iProbe
iProbe is an application that helps with the admin-
istration of the Axia devices and with it includes sup-
port for the bootstrap protocol. Within the application is
a button with an image of an investigator. When bootp
requests are received, a number will appear on the but-