
User`s guide

2: The Nickel Tour setup • 6
©2014 Axia Audio - Rev.1.3.8
Dene two unique Livewire channels. The Preview
mix channel number will be used as a console source
prole.
Congure a console source prole with the name
ExtPreview with Preview mix channel number used as
the Primary source. Make sure to select this source pro-
le as the External Preview source in each show prole.
If you are not familiar with how to create proles, please
refer to the manual for the console.
If having problems accessing this html interface,
make sure that the module is connected to the surface. If
the module is not active, the Intercom station in the DSP
engine will shutdown.
Softcom
The installation of Axia Livewire Softcom requires
also the installation of Apple Bonjour to be installed.
The install package should include an installer for bon-
jour for a 32-bit or 64-bit systems.
Once the application is started, select the Preferences
item under the Livewire menu.
In the new window, select the network interface con-
nected to the Livewire network.
Enter in a unique intercom label (default name takes
the host name of the PC), and alternate label.
Dene the unique Livewire channel source. Once
these items are set, the Softcom is ready to participate
with other intercom stations.
Defining Key assignments
Intercom stations have keys which are assigned to
other stations or external sources. If all stations have
been dened as explained above, then assigning keys is
the next step. The topic of external sources is covered
later in the manual.
Rackmount and desktop
Access the device through the web browser and se-
lect the Key Assignment link.
For each key, select a station from the drop down list.
The drop down list is generated by the discovery process,
so all stations that are congured and connected to the
network should appear. If this is not the case, insure you
have followed all the items from earlier in this chapter.
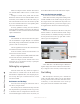
Axia console intercom module
Go to the Intercom link of the DSP engine.
Under the Intercom Key Assignment heading are the
channels available on the module. Using the drop down
list, assign a source to the channel. The drop down is cre-
ated through the discovery process. Don’t forget to press
the Apply button at the bottom of that channel group.
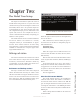
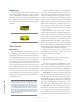
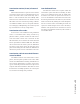
Softcom
Sofcom has no web interface but uses a front panel
interface similar to the IC.20 hardware model. Assign
sources (stations) to a channel by selecting a source from
the drop down located at the top right. With a source
selected, press the Assign button.
Figure 2-2: Assign Button
A faux LED next to the button begins to blink, this
signies assign mode. Press a button associated with a
key to assign the source to the key and end assign mode.
Start talking
With microphones connected, press a channel and
speak to the other station. That’s it! To get more details
on using external sources, interface with other devices,
set hierarchy, or more information on the various op-
tions; please review the remainder of the manual.