ActiveTagTM System AxcessView User Guide
AxcessView User’s Guide 750.008.005 R0003 2 © 2007, Axcess International, Inc..
AxcessView User’s Guide Notices Information provided in this manual is a result of the design and development of Axcess International, Inc.. products and is subject to change without notice. It applies only to current Axcess International, Inc.. systems. No part of this manual may be reproduced, translated or transmitted, in any form or by any means, without the prior written consent of Axcess International, Inc.. Responsibilities • Axcess International, Inc..
AxcessView User’s Guide Table of Contents INSTALLATION ................................................................................................................................................. 7 SYSTEM REQUIREMENTS .............................................................................................................................. 7 INSTALLING AXCESSVIEW .............................................................................................................................
AxcessView User’s Guide LOCATING PERSONNEL .............................................................................................................................. 31 LOCATING ASSETS ..................................................................................................................................... 32 LOCATING EVENTS ..................................................................................................................................... 32 CREATING REPORTS ................
AxcessView User’s Guide 750.008.005 R0003 6 © 2007, Axcess International, Inc..
AxcessView User’s Guide Installation System Requirements Before installing AxcessView, make sure you have the following system requirements: Hardware • PC mother board with 1 GHZ CPU (Intel Pentium III preferred) • 256 MB DRAM • 4 MB video RAM • 1 - serial port • 1 - parallel port • High speed EIDE disk controller interface • 1.
AxcessView User’s Guide Installing AxcessView There are two scenarios for installing AxcessView, First Time Installation and Updating a Previous Version of AxcessView. First Time Installation 1. Insert the AxcessView CD into your CD-ROM drive. 2. If you have a Plug and Play CD-ROM, an installation wizard displays. 3. Otherwise, select Run from the Start menu. 4. Type D:\Setup.exe (where D = your CD-ROM drive) and press ENTER or click OK. 5. Follow the prompts in the InstallShield Wizard. 6.
AxcessView User’s Guide © 2007, Axcess International, Inc.. 9 750.008.
AxcessView User’s Guide AxcessView Basics AxcessView displays information received from the ActiveTag RFID system. Pictures of personnel and assets are displayed along with information about where the Tags were read. AxcessView also can display alarms when a tagged asset is discovered without its owner. AxcessView supports a two-tier security system, consisting of Operators and Administrators. • Administrator – can modify all aspects of the database. • Operator – can only view data and confirm alarms.
AxcessView User’s Guide 1: Select Change Password from the Users menu located at the top of the AxcessView window. The Administrator Password dialog box will appear. 2: Type in the old password. 3: Type in a new password. 4: Retype the new password to confirm and click OK. Logging On If you are not login as the Administrator, the choices of the drop-down menus Manage Asset List and the Manage Personnel List will not be grayed out. 1: Select your user type – Administrator or Operator – from the User menu.
AxcessView User’s Guide 750.008.005 R0003 12 © 2007, Axcess International, Inc..
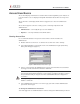
AxcessView User’s Guide Setting up the Database This chapter explains how to enter personnel and asset data, configure zones and configure AxcessView. IMPORTANT! In order to modify the database, you must be logged on as the Administrator. Personnel Information Specific personnel information must be entered into the AxcessView database. Such information includes tag ID number, first and last name, and assets that may be linked to that individual. Select Manage Personnel List from the File menu.
AxcessView User’s Guide Figure 3 Adding personnel information 2: Type the person’s name in the provided First Name and Last Name boxes. If the name has already been entered, AxcessView notifies you that this is a duplicate. 3: Type the tag ID number in the Tag ID box. NOTE The tag ID is an eight-digit number is comprised of the 3-digit Facility Code and the 5-digit tag ID number. Only the leading zeros may be omitted. 4: Select the Normal or Beacon tag type from the Tag Type drop-down list.
AxcessView User’s Guide Editing Personnel Information 1: Select the person’s name and click Edit. The Edit Personnel dialog box will appear (Figure 4). Figure 4 Editing personnel information 2: Modify the information displayed. 3: Click OK. The changes are reflected in the table. 4: Click Close to finish. Deleting Personnel Information 1: Select the person’s name and click Delete. You will receive a warning box. NOTE If an asset is linked to that person, the asset must be deleted first.
AxcessView User’s Guide Figure 5 Asset dialog box TIP The information can be sorted by clicking on each column heading. 750.008.005 R0003 16 © 2007, Axcess International, Inc..
AxcessView User’s Guide Adding Asset Information 1: Click Add. The Add Asset dialog box will appear (Figure 6). Figure 6 Adding an asset 2: Enter the tag ID number. (Refer to the Personnel Information section of this manual for more information.) The following information is optional: Description, Make, Model, and Serial Number. 3: Select Normal or Beacon tag type from the Tag Type drop-down list. NOTE Refer to the Tag Types section of this manual for more information.
AxcessView User’s Guide 2: Select a name from the Personnel List. This list includes all Personnel database entries. Double-click a name to get information about that person. 3: Click <
AxcessView User’s Guide 5: Click the Delete button at the top left of the Asset List screen. 6: You will receive a message asking, “Do you really want to delete item?” Click Yes to delete the asset information or click No to cancel. 7: Click Close to finish. Device Information Before zones can be created, remote device information must be entered into the AxcessView database. From the Configure menu, select System Configuration. The Device-Zone Setup dialog box will appear (Figure 8).
AxcessView User’s Guide Editing Device Information Only the description and type of a device can be changed. 1: On the Devices tab of the Device-Zone Setup dialog box, select the device listed in the table and click Edit. The Insert/Update section will become active. 2: Change the information displayed in the Description and Type boxes. 3: Click Update. The revised information will appear in the table. 4: Click OK to finish.
AxcessView User’s Guide 2: Type the zone ID (Receiver ID). 3: Enter a description of the zone. 4: Click the Update button. The information will appear in the table. 5: Click OK to finish. Editing a Zone Only the zone description may be changed. 1: On the Zones tab of the Device-Zone Setup dialog box, select the zone to be edited and click Edit. 2: Change the zone description and click Update. The revised information will appear in the table. 3: Click OK to finish.
AxcessView User’s Guide Adding a Device to a Zone 1: On the Zone Members tab of the Device-Zone Setup dialog box (Figure 10), select the zone from the table. A list of devices assigned to that zone will appear in the bottom left table, and a list of available devices is displayed in the bottom right table. 2: Select a device to be added from the Available Devices table on the right. 3: Click << Add. The device will be listed as a member of the selected zone in the left table.
AxcessView User’s Guide NOTE Old records will be automatically purged the next time the database is opened. Time Span Window Configuration 1: Select Time Span Window from the Configure menu. The Time Span Window dialog box appears (Figure 12). Figure 12 Time Span Window 2: The first box determines the time (in seconds) AxcessView waits for Tag information from both an asset and personnel. Enter the time (in seconds) in the box.
AxcessView User’s Guide Figure 13 Setting up alarms and relays 2: From the Action drop-down list, select the type of event that should cause an alarm condition. • Normal Tag Read – indicates a tag has passed through a RF field and broadcasted it identification information to a receiver. • Panic Tag Read – indicates an alarm code has been transmitted from a tag in which the panic button on the tag has been depressed.
• AxcessView User’s Guide Comment – employee’s name, asset or event information and alarm messages • Location – activator ID and description of the location • Zone – receiver ID and zone description. If a zone has not been assigned, “Unknown” will be displayed.
ActiveTrac User’s Guide Running AxcessView Connecting to a Device 1: From the Connection menu, select Connect Device or click the green Connect button on the tool bar: The Device Connection dialog box will appear (Figure 14). Connect button NOTE You must have a database open to connect to a Device. Figure 14 Connecting to a device. 2: Select the connection method – Network or RS-232 Cable. The rest of the dialog box becomes active according to what connection method you selected.
AxcessView User’s Guide NOTE If you want to connect to multiple devices, repeat Steps 1-5 to add each device. Auto Reconnect Selecting the Auto Reconnect option in the Device Connection dialog box sets the Device Connection to automatically reconnect each time you log on to AxcessView. This only works with TCPIP network receivers. Tags Types Tags are part of the ActiveTag automatic identification product line.
AxcessView User’s Guide Figure 15 Configuring the Beacon Tag Options 2: Fill in the Beacon Timeout (in numbers of minutes). 3: In the Timeouts before warning and Timeouts before alarm boxes, select the number of times the tag should time out before sending a warning or an alarm. 4: From the Low battery generates drop-down list, select Warning or Message.
AxcessView User’s Guide including temperature. Location-Description Activator ID and description/location. Zone-Description Receiver ID and zone description. If a zone has not been assigned, “Unknown” will be displayed. Time/Date Time and date when event occurred Type Type of tag Event A sequential number for each event, including alarm confirmations and acknowledgments. More information about an event can be viewed by double-clicking the line in the log list.
AxcessView User’s Guide Figure 16 An alarm dialog box Types of Alarms The following alarms can be displayed by AxcessView: Linked Asset – No Owner Specified: [description] Indicates that an asset was detected that did not have an owner assigned through the Asset Management section. When this alarm appears, a warning message will state, “Primary Owner of [asset ID] not found” Beacon Timeout! The time period for a beacon tag read to expire.
AxcessView User’s Guide Click Information to see information about the person or the asset - too hot, too cold, cabinet open. The alarm must be confirmed or acknowledged before the alarm dialog box will clear. Acknowledging Alarms Click Acknowledge to return to the log list. The alarm event will remain red. Alarms can only be acknowledged once, if the Alarm Confirmation dialog box is brought up again, the alarm must be confirmed. Low Battery! The battery level is low and may expire soon.
AxcessView User’s Guide Figure 18 Locating Personnel 2: Select the name of the person you want to locate. Information about the last Tag event appears in the Last Known Location boxes. 3: A Movement History report can be viewed on a specific person. Double-click or select the person from the list and then click Movement History. 4: The information that appears in the Personnel Movement History can be printed or saved. Select either the printer or the folder icon located at the top of the window.
AxcessView User’s Guide 5: Click Close to finish. Creating Reports Five different types of reports can be generated in AxcessView.
AxcessView User’s Guide 750.008.005 R0003 34 © 2007, Axcess International, Inc..
AxcessView User’s Guide Index Alarms ................................................................................4 Acknowledging ..............................................................5 Confirming .....................................................................5 Assets Data Entry ....................................................................15 Locating .........................................................................7 Auto Reconnect ............................................