Activator Installation Manual
Activator Installation Manual Notices Information provided in this manual is a result of the design and development of AXCESS Inc. products and is subject to change without notice. It applies only to current AXCESS Inc. RFID systems. No part of this manual may be reproduced, translated or transmitted, in any form or by any means, without the prior written consent of AXCESS Inc.
Table of Contents GENERAL INSTALLATION INFORMATION .......................................................................... 4 SAFETY ................................................................................................................................... 4 INFORMATION FLAGS................................................................................................................ 4 HAND TOOLS, EQUIPMENT AND MATERIALS ...........................................................................
Activator Installation Manual General Installation Information Safety Personal safety is of first importance in the performance of any job. • Installation and configuration of the ActiveTag system should only be performed by experienced installers. • Where practical or required by code, all wiring should be enclosed in conduit, or equivalent protection, firmly anchored to sturdy structural elements and protected from mechanical damage. • Hand tools should be of good quality and properly maintained.
Activator Installation Manual Hand Tools, Equipment and Materials The following are provided, required and recommended hand tools, equipment and materials necessary for the successful configuration and installation of the Activator: Provided Materials Unpack the Activator.
Activator Installation Manual Recommended 6 • Ladder • Fishing line – 15 lb. test for pulling cable • Tie wraps and anchors • A pair of walkie-talkies if more than one installer will be on site • Laptop computer to connect to the Activator easily • Instructions for all third party devices 750.001.006 R04 © 2005, AXCESS Inc.
Activator Installation Manual Overview The Activator is a stand-alone transmitter that connects directly to an application-specific transmit antenna to provide low frequency activation signal that awakens tags as they pass through the antenna’s field. The Activator writes its location ID to the tag, which is then retransmitted, along with the tag’s unique ID to the Receiver. From this information, the Receiver uses the Activator ID to determine what action to take with the Tag data.
Activator Installation Manual The Activator has the following functions: Control Point Architecture Limits the tag activation to specific user-defined points or zones for tracking and control. Adjustable Power The Activator’s activation zone can be sized using a simple tuning tool with exterior LED power-level indicators. Signal Penetration The Activator’s low frequency signal penetrates briefcases, luggage, clothing, people, and virtually all non-metallic building materials.
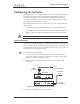
Activator Installation Manual Configuring the Activator The Activator can be configured with its own user-defined location ID via serial port (using a PC or terminal communications device) or manually via jumpers. The unit installs easily and offers flexible coverage for perimeter doors, interior zones, vehicle lanes and other control points throughout the facility.
Activator Installation Manual Setting the Activator ID The Activator sends its ID number in the wake-up signal. The Tag then transmits both its own ID and the device ID of the Activator to the Receiver. IMPORTANT! All Activators are given the same ID number (127) at the factory. Each Activator in a multi-Activator application needs to be set with a unique ID number to ensure proper behavior of the system.
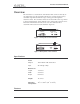
Activator Installation Manual Open Com Port RS-232 Cable Back Panel DATA RS-232 TX CNTL POWER GND +24VDC + - Figure 4 Connecting computer to the Activator To communicate via Windows HyperTerminal 1: From the Start button on the computer’s desktop, select Programs > Accessories > Communications > HyperTerminal. 2: In the Explorer window that appears, double-click the Hypertrm.exe icon to launch the HyperTerminal application.
Activator Installation Manual Figure 6 Select a com port 5: Enter the following information in the Com Properties dialog box: Bits per second (Baud) Data Bits Parity Stop Bits Flow Control 19200 8 None 1 None 6: Click OK. To change the Activator ID number If your ActiveTag system is using Version 5 Tags, type one of the default Activator ID numbers in Table 1 followed by an exclamation point “!”. The number will be accepted as the Activator’s ID number. NOTE 127 is the default Activator ID.
Activator Installation Manual Method 2: Hardware When set with jumpers, the Activator ID is a binary number represented by jumpers. A 1 is represented by a jumper on the header and a 0 is represented by an absence of a jumper (Table 2). Once an Activator ID is set by jumpers, it can not be reset with serial commands. In order for serial commands to take effect, the jumpers must be removed, the unit must powered down and then rebooted.
Activator Installation Manual 2: Carefully remove the lid from the Activator case and locate the JP12-JP19 jumper block. 3: Using needle-nose pliers, place jumpers on headers JP12 through JP19 (Figure 7) to represent the ID number in binary. A jumper on a header represents a one and absence of a jumper is a zero. JP12 is the least significant bit and JP19 is the most significant bit.
Activator Installation Manual Serial Port Commands There are commands available to list a help screen and change the baud rate of the Activator’s serial port.
Activator Installation Manual Activator Installation The Activator originates the signal that is broadcast by the transmit antenna. The Activator should be installed as close as possible to the transmit antenna, and up to 50 feet away by cable distance from the antenna. Contact Distributor Support for assistance with extended distance installations. The shorter the cable, the better the system will perform.
Activator Installation Manual Activation Field Size The Tag activation area can be controlled by adjusting the size of the activation field. For example, you may want to shrink the activation field to concentrate the field near a doorway, preventing activation of tags further up the hall. NOTE Each Activator is shipped from the factory with its activation control adjusted to its highest level.
Activator Installation Manual Index Activation Field Size, 17 Adjusting the Field, 17 Adjustable Power, 8 Changing Activator ID Numbers, 12 Configuring Activator, 9 Connecting Computer to Activator, 10 Connecting Power, 9 Control Point Architecture, 8 Features, 7 Flexible Installation, 8 Front Panel, 7 Hotline, 2 Information Flags, 4 Installation, Activator, 16 Jumper Positions, 13 18 750.001.