
User's Manual


DLNA Audio Receiver
3
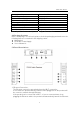
connection process.
2. Optical
Output audio to Amplifier Receiver
3. USB
Connect this port to USB storage device, and mobile phone can play the music
from the USB storage device.
4. DC/5V
Connect this port to the Power adapter.
5. Stereo Female:
Connect this port to Stereo Speaker or Amplifier Receiver via one piece of
stereo cable.
6. VOL-
Decrease volume
7. VOL+
Increase volume
8. Mute
9. Reset
10. WLAN LED (monocolor red)
OFF when the product is connected/connecting in Ethern
‐ et.
Blinking while the product is connecting to Wi‐ -Fi.
Blinking when the product fail to connect to Wi‐ -Fi (e.g., cannot get an IP
address).
Stable OFF after a configurable time (to show the ‘not connected state’)
Stable ON when the device is successf‐ ully connected
11. LAN LED (monocolor red)
OFF when no Ethernet cable is connected
‐
OFF when the product is connected in Wi‐ -Fi.
Blinking while the product is connecting through Ethernet..‐
Blinking when the product fail to connect to Ethernet. (e.g.,‐ cannot get an IP
address).
Goes stable OFF after a configurable time (to show the ‘not connected state’)
Stable ON when the device is successfully connected‐
12. Power LED (bicolor red/blue)
Stable RED during boot.‐
Stable BLUE after boot.‐
Blinking ‐ BLUE during firmware upgrade.
Blinking RED during factory reset.‐
13. WPS button (Wi-Fi connection)
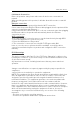
As of today, the Wi-Fi connection process can be launched only through WPS.
1. Press the WPS button of your access point
2. Press the WPS button of the product
3. The connection is successful once the Wi-Fi LED gets stable ON.
Later on, once the access point mode will be available, user will be able to
connect from an Android phone to this product and configure the Wi-Fi
connection manually.