
User's Manual
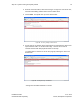

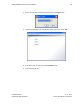
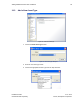
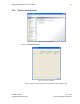
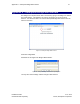
Table Of Contents
- 1 Introduction
- 2 Installation Steps
- 3 Step #1 – Configure Regions
- 4 Step #2 – Preparing for Installation
- 5 Step #3 – Installing the Appliance
- 6 Step #4 – Installing the Bridge
- 7 Step #5 – Installing the Sensors
- 8 Step #6 – Installing the Tags
- 9 Step #7 – Associating the Tags with Assets
- 10 Step #8 – System Testing and Quality Control
- 11 Adding Additional Assets After Installation
- 12 Troubleshooting

Adding Additional Assets After Installation 62
Installation Guide v2.3 – 5/10
Confidential and Proprietary ©2010, Awarepoint Corporation
11 Adding Additional Assets After Installation
After the initial installation at a customer site, additional assets at that site need to be
added to the Awarepoint system.
Assets can be added using System Manager or Infopoint.
In some cases, it may be easier to add assets while you are not connected to the site
network or even to the Internet. To begin with, you will need an Internet connection to
launch System Manager and to connect to the site through System Manager. Then
you can choose to go offline and add assets.
The following section explains how to use System Manager as an offline Asset
Manager to add assets.
11.1 System Manager
1. Open a web browser and navigate to
http://demo.awarepoint.com/SystemManager.
Figure 84 - Download System Manager
2. Choose Launch System Manager.
Figure 85 - System Manager Login