
User's Manual

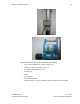
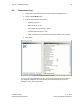
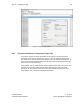
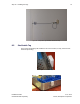
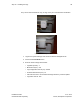
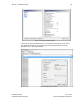
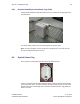
Table Of Contents
- 1 Introduction
- 2 Installation Steps
- 3 Step #1 – Configure Regions
- 4 Step #2 – Preparing for Installation
- 5 Step #3 – Installing the Appliance
- 6 Step #4 – Installing the Bridge
- 7 Step #5 – Installing the Sensors
- 8 Step #6 – Installing the Tags
- 9 Step #7 – Associating the Tags with Assets
- 10 Step #8 – System Testing and Quality Control
- 11 Adding Additional Assets After Installation
- 12 Troubleshooting

Step #6 – Installing the Tags 48
Installation Guide v2.3 – 5/10
Confidential and Proprietary ©2010, Awarepoint Corporation
They can be attached inside the tray, as long as they are removed before sterilization.
Figure 70 - Autoclave Tag in Bracket
Figure 71 - Autoclave Tag Removed from Bracket
1. Log into the System Manager and choose the Device Management tab.
2. Choose the Create Mode button.
3. Enter the mode settings shown below:
▪ Tag Blink Quantity: 3
▪ Blink Interval (sec): 600
▪ Tag Configuration Interval (sec): 86400
▪ In-Motion Blink Interval (sec): 15
▪ Check the box next to “Send Status Message with Every Location Update”
▪ Tag Status Interval: 600