
User's Manual

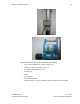
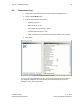
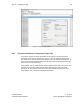
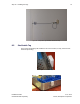
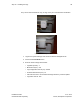
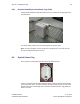
Table Of Contents
- 1 Introduction
- 2 Installation Steps
- 3 Step #1 – Configure Regions
- 4 Step #2 – Preparing for Installation
- 5 Step #3 – Installing the Appliance
- 6 Step #4 – Installing the Bridge
- 7 Step #5 – Installing the Sensors
- 8 Step #6 – Installing the Tags
- 9 Step #7 – Associating the Tags with Assets
- 10 Step #8 – System Testing and Quality Control
- 11 Adding Additional Assets After Installation
- 12 Troubleshooting

Step #6 – Installing the Tags 43
Installation Guide v2.3 – 5/10
Confidential and Proprietary ©2010, Awarepoint Corporation
6. Either upload a .csv file with a listing of the MAC addresses of the appropriate
devices, or type the MAC addresses into the ‘MAC Addresses’ field.
7. Choose ‘Create.’
Figure 62 - Batch Create Tags in Status Server
8.3 Physical Installation
Tags are attached to assets using a variety of methods, including double-sided tape or
zip-tie.
Note: After tightening zip-ties, cut off the excess portion flush with locking connection
to avoid leaving sharp edges.
These are the general guidelines when installing Tags.
▪ Don’t mount asset Tags underneath or inside an asset.
▪ Place at approximately three feet above ground level when possible.
▪ Avoid mounting Tag directly to metallic surfaces when possible.
▪ Attach the Tag in a manner that the MAC address is visible.
▪ Avoid flat placement (e.g. green/red strip facing up toward the ceiling or down
toward the floor)