
User's Manual


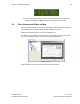
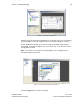
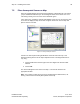


Table Of Contents
- 1 Introduction
- 2 Installation Steps
- 3 Step #1 – Configure Regions
- 4 Step #2 – Preparing for Installation
- 5 Step #3 – Installing the Appliance
- 6 Step #4 – Installing the Bridge
- 7 Step #5 – Installing the Sensors
- 8 Step #6 – Installing the Tags
- 9 Step #7 – Associating the Tags with Assets
- 10 Step #8 – System Testing and Quality Control
- 11 Adding Additional Assets After Installation
- 12 Troubleshooting

Step #5 – Installing the Sensors 38
Installation Guide v2.3 – 5/10
Confidential and Proprietary ©2010, Awarepoint Corporation
7.5 Place Awarepoint Sensor on Map
Open the System Manager and choose the Positioning: Configuration tab. The Sensor
you just installed should show up in the Unassigned section of the device tree. If it is
functioning correctly, the icon for the Sensor should be green.
In the device tree, expand the Campus and Building so that you can see the floor. Click
on the floor to display the map for the floor. Drag the Sensor icon onto the map and
place it where it is located.
Figure 54 - Placing Awarepoint Sensors
Sensors can also be placed using the S button on the left side of the map. This
method of placing Sensors on the map is helpful if the list of unassigned Sensors is
very long.
1. Choose the S button and then type in the last 5 digits of the Sensor’s MAC
address.
2. Choose OK.
The Sensor will appear in the center of the map. It can then be moved to the
appropriate location.
Note: Use caution to make sure that you are repositioning the added Sensor, not
moving a Sensor that has already been placed on the map.