
User's Manual


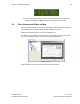
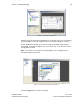
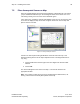


Table Of Contents
- 1 Introduction
- 2 Installation Steps
- 3 Step #1 – Configure Regions
- 4 Step #2 – Preparing for Installation
- 5 Step #3 – Installing the Appliance
- 6 Step #4 – Installing the Bridge
- 7 Step #5 – Installing the Sensors
- 8 Step #6 – Installing the Tags
- 9 Step #7 – Associating the Tags with Assets
- 10 Step #8 – System Testing and Quality Control
- 11 Adding Additional Assets After Installation
- 12 Troubleshooting

Step #5 – Installing the Sensors 37
Installation Guide v2.3 – 5/10
Confidential and Proprietary ©2010, Awarepoint Corporation
7.2 Physical Installation
The Sensors are installed in standard electrical power receptacles. Prior to installing
the Sensor you must locate a powered outlet. Verify that the receptacle has power by
using an electrical tester. For S2C and S2U Sensors, use the appropriate approved
power cord matching the receptacle.
7.3 Secure Awarepoint Sensors
Unless otherwise directed by Project Manager, the preferred method of securing
Sensors to outlets is to use 3M VHB double sided tape to affix Sensors to electrical
outlet. Apply double-sided tape strip to the top of the output faceplate and install the
Sensor, being sure to achieve sufficient contact between the tape and the Sensor.
Apply pressure for 10-15 seconds to maximize adhesive strength. (Note: There are
other methods of securing Sensors. These methods would have to be pre-approved by
Awarepoint VP of Professional Services)
CAUTION: To remove a Sensor that has been secured in place, slide a plastic putty knife between
Sensor and faceplate. Be sure to avoid contact with the electrical prongs with anything
except the plastic putty knife. If this method of Sensor removal will not work, another
method is to use an insulated blade screwdriver to first remove the electrical faceplate
and Sensor from the wall, then separate the Sensor from the faceplate. NEVER reach
behind the Sensor in an effort to insert or remove it from the outlet as electrical shock
may occur if you contact the electrical prongs while they are still inserted in the outlet.
For insertion or removal, grasp the Sensor by the sides only.
7.4 Verify the Sensor Connects to the Network
Once you plug the Sensor into an outlet, it will attempt to connect to the Awarepoint
network. This process will take approximately one minute. When the Sensor has
completed this process, the Network LED will be illuminated Green. If the Sensor is
unable to connect to the network (out of range of a network or network not properly
configured), the Sensor will continue to attempt to connect to the network and the
Network LED will be Red.
If a Sensor keeps cycling through different colors, that Sensor needs to be replaced.
Note: If the Sensor is not running the most current firmware, it may not be able to
successfully connect to the network until the firmware is updated.
Once the Sensor has successfully connected to the network, mark the Sensor location
and its MAC address on a paper copy of the map.