
User's Manual


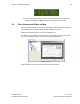
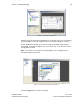
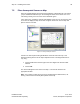


Table Of Contents
- 1 Introduction
- 2 Installation Steps
- 3 Step #1 – Configure Regions
- 4 Step #2 – Preparing for Installation
- 5 Step #3 – Installing the Appliance
- 6 Step #4 – Installing the Bridge
- 7 Step #5 – Installing the Sensors
- 8 Step #6 – Installing the Tags
- 9 Step #7 – Associating the Tags with Assets
- 10 Step #8 – System Testing and Quality Control
- 11 Adding Additional Assets After Installation
- 12 Troubleshooting

Step #4 – Installing the Bridge 33
Installation Guide v2.3 – 5/10
Confidential and Proprietary ©2010, Awarepoint Corporation
Figure 47 - No Settings Were Changed
12. Once the Bridge has booted, the user can enter the Bridge Menu any time by
pressing the Cursor and Enter buttons at the same time once or twice.
6.5 Place Awarepoint Bridge on Map
Open the System Manager and choose the Positioning: Configuration tab. Expand the
Sensors/Bridges tree and select the floor where the Bridge is located.
Expand the unassigned section of the Sensors/Bridges tree.
The Bridge you just installed should show up in the Unassigned section of the device
tree. If it is functioning correctly, the icon for the Bridge should be blue.
Figure 48 – Bridge Icons
Drag the Bridge icon onto the map and place it where it is located.