
User's Manual


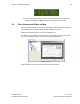
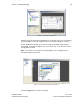
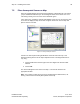


Table Of Contents
- 1 Introduction
- 2 Installation Steps
- 3 Step #1 – Configure Regions
- 4 Step #2 – Preparing for Installation
- 5 Step #3 – Installing the Appliance
- 6 Step #4 – Installing the Bridge
- 7 Step #5 – Installing the Sensors
- 8 Step #6 – Installing the Tags
- 9 Step #7 – Associating the Tags with Assets
- 10 Step #8 – System Testing and Quality Control
- 11 Adding Additional Assets After Installation
- 12 Troubleshooting

Step #4 – Installing the Bridge 32
Installation Guide v2.3 – 5/10
Confidential and Proprietary ©2010, Awarepoint Corporation
4. Follow the steps through the configuration menu to configure the Bridge.
Answer the question of “Auto-Negotiate Link?” by using the Cursor button to
place the screen cursor under “YES” or “NO.” Press the Enter button to choose
the selection and advance to the next screen.
Figure 43 - Auto-Negotiation Link
5. If the answer is “NO,” follow the questions to answer “Link Speed” and “Duplex
Mode.”
6. Answer the “Use DHCP?” question the same way as the last question. After the
selection is made, press the Enter button to take the selection and advance to
the next screen.
Figure 44 - DHCP option
7. If the answer is “NO,” follow the questions to fill in the IP address, subnet mask
and default gateway.
8. Answer the “Auto Discover Server” question in the same manner as the above
questions. Press the Enter button to take the selection and advance to the
screen.
Figure 45 - Auto Discover Server
9. If the answer is “NO,” enter the IP address of the server on the next screen
prompt.
10. Answer the “Save Settings” question. After pressing the Enter button, the
Bridge will boot with the new settings.
Figure 46 - Save Settings for B2 Bridge
11. If the answer is “NO,” the save will be cancelled and the Bridge will boot with
the existing settings.