
User's Manual


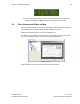
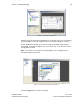

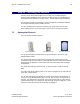
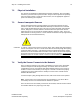


Table Of Contents
- 1 Introduction
- 2 Installation Steps
- 3 Step #1 – Configure Regions
- 4 Step #2 – Preparing for Installation
- 5 Step #3 – Installing the Appliance
- 6 Step #4 – Installing the Bridge
- 7 Step #5 – Installing the Sensors
- 8 Step #6 – Installing the Tags
- 9 Step #7 – Associating the Tags with Assets
- 10 Step #8 – System Testing and Quality Control
- 11 Adding Additional Assets After Installation
- 12 Troubleshooting

Step #4 – Installing the Bridge 31
Installation Guide v2.3 – 5/10
Confidential and Proprietary ©2010, Awarepoint Corporation
6.3.1 Configure Network Interface – B1 Model Only
1. Plug the Bridge into the power outlet.
2. Open TeraTermpro and press the Enter button three times. This will initiate the
program.
3. On the terminal program you should see boot information. When prompted,
press ‘c’ to configure the IP Address settings. At the prompt, enter return to
accept the existing MAC address.
4. At the next prompt, if using DHCP to set the IP address of the Bridge then press
Y. Otherwise (if you are setting the IP address with a static IP address) press N,
and enter the IP Address, subnet mask, and default gateway for this Bridge.
5. Enter the IP Address of the Appliance.
The Bridge will proceed to ping the Appliance, test communications with the Appliance,
and perform an internal test. If the communications tests fail, change the IP address
settings and retry.
After verifying network configuration settings, if the Bridge still fails, you may need to
use the Network Analyzer to determine the problem with the port.
If the internal test (“Zigbee Board test”) fails, replace the Bridge.
6.4 Configure Network Interface – B2 Model Only
1. Plug the Bridge into the Ethernet cable and power outlet.
2. As the Bridge boots, watch for the “Press enter for tools and setting” message
on the LCD screen. Press the Enter button once to enter the menu.
Figure 41 - B2 Enter for Settings & Tools
3. Press the Cursor button until it is under the Configuration menu. Press the
Enter button to go into the configuration menu.
Figure 42 - B2 Menu