
User's Manual
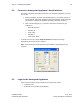
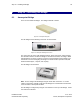
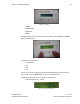
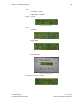
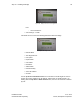
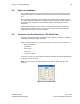
Table Of Contents
- 1 Introduction
- 2 Installation Steps
- 3 Step #1 – Configure Regions
- 4 Step #2 – Preparing for Installation
- 5 Step #3 – Installing the Appliance
- 6 Step #4 – Installing the Bridge
- 7 Step #5 – Installing the Sensors
- 8 Step #6 – Installing the Tags
- 9 Step #7 – Associating the Tags with Assets
- 10 Step #8 – System Testing and Quality Control
- 11 Adding Additional Assets After Installation
- 12 Troubleshooting

Step #4 – Installing the Bridge 29
Installation Guide v2.3 – 5/10
Confidential and Proprietary ©2010, Awarepoint Corporation
Figure 38 - Bridge Connected to the Appliance
If No:
– Server IP Address
▪ Save Settings – Yes/No
Info allows the user to view the following information about the Bridge.
Figure 39 - Bridge Information
▪ Ethernet MAC
▪ Auto-Negotiate Link
▪ Link Speed
▪ Duplex Mode
▪ Use DHCP?
▪ IP Address
▪ Subnet Mask
▪ Default Gateway
▪ Server IP Address
▪ Channel
Use the up arrow and down arrow buttons to increment a number higher or lower to
achieve the correct number for an IP address, subnet mask, or default gateway. By
holding down the Up Arrow or Down Arrow buttons, the user can increment a number
by tens.