
User's Manual
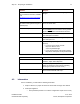
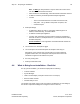

Table Of Contents
- 1 Introduction
- 2 Installation Steps
- 3 Step #1 – Configure Regions
- 4 Step #2 – Preparing for Installation
- 5 Step #3 – Installing the Appliance
- 6 Step #4 – Installing the Bridge
- 7 Step #5 – Installing the Sensors
- 8 Step #6 – Installing the Tags
- 9 Step #7 – Associating the Tags with Assets
- 10 Step #8 – System Testing and Quality Control
- 11 Adding Additional Assets After Installation
- 12 Troubleshooting

Step #3 – Installing the Appliance 20
Installation Guide v2.3 – 5/10
Confidential and Proprietary ©2010, Awarepoint Corporation
5 Step #3 – Installing the Appliance
5.1 Awarepoint Appliance
The Awarepoint Appliance is shown.
Figure 24 - Awarepoint Appliance - front view
The Awarepoint Appliance is a one-rack unit server, nominally configured with
redundant hard drives. It uses a Linux based operating system.
Note: These drawings depict a Dell PE1950. Other versions of the Awarepoint
Appliance may have different configurations
Note: Gb2 = eth0, and Gb1 = eth1
Figure 25 - Awarepoint Appliance Diagram - Rear (Dell PowerEdge 1950)
1
remote access controller (optional)
2
serial connector
3
video connector
4 USB connectors (2) 5 Gb1 connector (eth 1) 6 Gb2 connector (eth 0)
7
power supply 1
8
power supply 2 (optional)
9
system status indicator
10 system identification button 11 system status indicator
connector
12 left PCI expansion slot
(slot 2)
13
center PCI expansion slot (slot 1)