
User's Manual


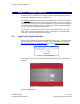

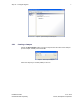
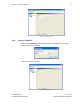
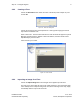
Table Of Contents
- 1 Introduction
- 2 Installation Steps
- 3 Step #1 – Configure Regions
- 4 Step #2 – Preparing for Installation
- 5 Step #3 – Installing the Appliance
- 6 Step #4 – Installing the Bridge
- 7 Step #5 – Installing the Sensors
- 8 Step #6 – Installing the Tags
- 9 Step #7 – Associating the Tags with Assets
- 10 Step #8 – System Testing and Quality Control
- 11 Adding Additional Assets After Installation
- 12 Troubleshooting

Step #1 – Configure Regions 5
Installation Guide v2.3 – 5/10
Confidential and Proprietary ©2010, Awarepoint Corporation
3 Step #1 – Configure Regions
Normally this step is performed first. Maps are created, loaded and configured before
the physical installation begins at the customer site.
It is extremely important to determine the areas ahead of time. Each floor area needs
to be discussed with the customer before beginning this step. If the customer asks for
areas to be reconfigured after the initial configuration, the rooms will have to be deleted
and redrawn, which is difficult and very time consuming. Planning ahead will optimize
your time and your relationship with the customer.
You must have a digital map of the facility in one of the following formats: JPG, GIF,
PNG. PNG is preferred, with dimensions of 2500 x 2500 pixels. The recommended
image size is 2-4 MB, but must be less than 8 MB.
3.1 Login to the System Manager
Access System Manager via the Network Operations Center (NOC). This can be done
without being on the Local Network. To do this, open a web browser and Navigate to
http://aps.awarepoint.com/SystemManager and choose Launch System Manager.
Figure 2 - Launch System Manager
At the login screen, enter your Awarepoint Network Operations Center username and
password.
Figure 3 - System Manager Login
Choose the Login button.