
User's Manual

6
2 Awarepoint Bridge Installation
2.1 Physical Installation
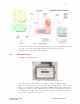
Find a suitable location for the Bridge. Mounting in switch closets is preferred,
as the Bridge is less likely to be disturbed. You will need one power outlet and
one Ethernet port. Prior to installing the Bridge, read its MAC address from the
bottom. Indicate on a paper copy of the map where this Bridge is located
along with its MAC address.
Attach double-sided tape to each corner on the bottom of the Bridge and
press the Bridge against the surface to affix it.
2.2 Connect to the Serial Interface
Connect a serial cable between the Bridge and the computer you will use to
configure the Appliance (normally your laptop computer).
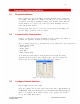
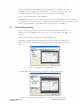
Open a terminal program (e.g. TeraTerm) and set the serial port on your computer to:
• Baud: 38,400 baud
• Data Bits: 8
• Parity: None
• Stop Bits: 1
• Flow control: None
To do this in Tera Term, click on Setup: Serial Port and adjust the settings
appropriately for the port on your computer. Note - the Port setting in the
image below may be different, depending upon your computer.
Figure 2-1: Tera Term Serial Port Setup
2.3 Configure Network Interface
Plug the Bridge into the power outlet.
Open the terminal and press the ‘Enter’ button three times. This will initiate the
configuration script. You should now see boot information. When prompted,
press ‘c’ to
configure the IP Address settings. At the prompt, enter return to
accept the existing MAC address.
Awarepoint Bridge model B2 © 2008 Awarepoint Corporation
Installation Manual