
Manual
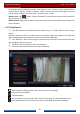
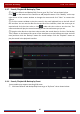
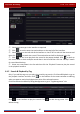
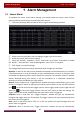
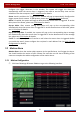
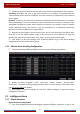
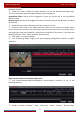
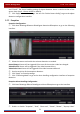
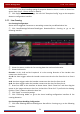
Table Of Contents
- Contents
- 1 Introduction
- 2 Basic Operation Guide
- 3 Wizard & Main Interface
- 4 Camera Management
- 5 Live Preview Introduction
- 6 PTZ
- 7 Record & Disk Management
- 8 Playback & Backup
- 9 Alarm Management
- 10 Account & Permission Management
- 11 Device Management
- 12 Remote Surveillance
- Appendix A FAQ
- Appendix B Calculate Recording Capacity
- Appendix C Compatible Device List

Alarm Management
DVR User Manual
72
following interface.
② Select the camera, enable the object detection and set the duration and detect type.
There are two detect types: Abandoned object and missing object.
Abandoned object: Alarms will be triggered if there are articles left in the pre-defined
detection area.
Missing object: Alarms will be triggered if there are articles missing in the detection area drew
by the users.
③ Select the alarm area. A maximum of 4 alarm areas can be set.
④ Draw the alarm area of the object detection. Refer to the interface as shown above.
Check “Draw Area” and then click around the area where you want to set as the alarm area in
the image (the alarm area should be a closed area). Uncheck the “Draw Area” if you finish the
drawing. Click the “Clear” button to delete the alarm area.
⑤ Click “Apply” to save the settings.
⑥ Click “Processing Mode” to go to the alarm handling configuration interface of object
detection.
Object Detection Alarm Handling Configuration:
① Click StartSettingsAlarmIntelligence AlarmObject Detection to go to the
following interface.
② Enable or disable “Snapshot”, “Push”, “Alarm-out”, “Preset”, “Buzzer”, “Pop-up Video”