
Manual

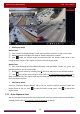
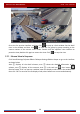
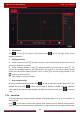
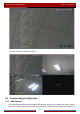
Table Of Contents
- Contents
- 1 Introduction
- 2 Basic Operation Guide
- 3 Wizard & Main Interface
- 4 Camera Management
- 5 Live Preview Introduction
- 6 PTZ
- 7 Record & Disk Management
- 8 Playback & Backup
- 9 Alarm Management
- 10 Account & Permission Management
- 11 Device Management
- 12 Remote Surveillance
- Appendix A FAQ
- Appendix B Calculate Recording Capacity
- Appendix C Compatible Device List

Live Preview Introduction
DVR User Manual
27
5 Live Preview Introduction
5.1 Preview Interface Introduction
The connected analog camera will be added automatically in the live preview interface for
previewing. You should add IP camera manually for previewing (see 4.2.1 Add Camera
for
details). Refer to the interface as shown below, drag one camera in the preview window to
another window for camera window exchanging.
The record symbols with different colors in the live preview window refer to different record
types when recording: green stands for manual record, red stands for sensor-based record,
yellow stands for motion-based record, blue stands for schedule record and cyan stands for
intelligence record.
Click the preview window to show the tool bar as shown in area ①; right click the preview
window to show the menu list. The tool bar and menu list are introduced in the table below.
Button Menu List Meaning
-- Move tool. Click it to move the tool bar anywhere.
Manually Record On Click it to start recording.
Instant Playback
Click
to playback the record; click “Instant Playback” to select or
self-define the instant playback time. See 8.1 Instant Playback
for details.
Enable Audio
Click it to enable audio. You can listen to the camera audio by enabling
audio.
Snap
Click it to pop up the snap window. Click “Save” in the window to save
the image. Click “Export” to export the image.
PTZ Control Click it to go to PTZ control interface. See Chapter 6 PTZ for details.