
Manual
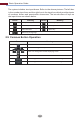
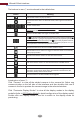

The buttons in area ① are introduced in the table below.
Wizard & Main Interface
19
Button Meaning
Start button. Click it to pop up area ①
Screen mode button.
Full screen button. Click it to show full screen; click it again to exit the full
screen.
Dwell button (see 5.2.2 Quick Sequence View and 5.2.3 Scheme View In
Sequence for details).
Click it to enable OSD; click again to disable OSD.
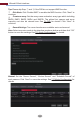
Click to set the default playback time before starting instant playback (8.1
Instant Playback) or going to the playback interface for playback operations
(8.2 Playback Interface Introduction); click to go to the playback interface.
For instance, if you choose “5 minutes ago” as the default playback time, you
can playback the record from the past five minutes.
Manual record button. Click it to enable/disable record.
Manual alarm button. Click it to trigger or clear the alarm-out manually
in the popup window.
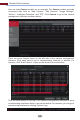
Record status button. Click it to view the record status.
Alarm status button. Click it to view the alarm status.
Disk status button. Click it to view the disk status and RAID status.
Network status button. Click it to view the network status.
Click this button to enable/disable cloud upgrade.
Information button. Click it to view system information, including basic
information, camera status, alarm status, record status, network status, disk
information, backup status and user status.
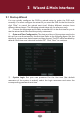
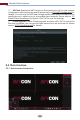
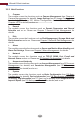
Introduction of area ②:
Click “Camera” to view all the added cameras in the camera list. Select one
camera window on the left side of the interface and then double click one IP
camera in the list to preview the camera image in the selected window.
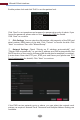
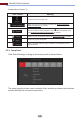
Click “Customize Display Modes” to view all the display modes in the display
mode list (refer to 5.2.1 Display Mode for detail configuration of the display mode).
Double click one display mode in the list to switch to the display mode for
previewing.