
Manual


Device Management
97
11.1.6 UPnP Configuration
By UPnP you can access the DVR through the web client which is in WAN via
router without port mapping.
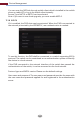
11.1.7 NAT Configuration
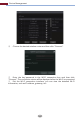
Click Start Settings Network NAT to go to the interface for NAT
configuration. Check “Enable” and then select the NAT server address. Click
“Apply” to save the settings.
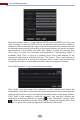
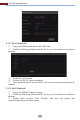
Click “Refresh” to refresh the UPnP status. If the UPnP status were still “Invalid
UPnP” after refreshing it for many times, the port number would be wrong. Please
change the mapping type to “Manual” and then click to modify the port until
the UPnP status turns to “Valid UPnP”. Refer to the following picture. You can
view the external IP address of the DVR. Enter the external IP address plus port
in the address bar to access the DVR such as http://183.17.254.19:81.
①
②
③
④
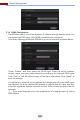
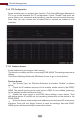
Click StartSettingsNetworkUPnP to go to the following interface.
Make sure the router supports UPnP function and the UPnP is enabled in
the router.
Set the DVR’s IP address, subnet mask and gateway and so on
corresponding to the router.
Check “Enable” in the interface as shown below and then click “Apply”.