
User Manual
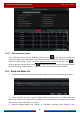
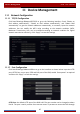
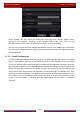
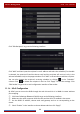
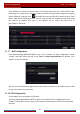


Table Of Contents
- Contents
- 1 Introduction
- 2 Basic Operation Guide
- 3 Wizard & Main Interface
- 4 Camera Management
- 5 Live Preview Introduction
- 6 PTZ
- 7 Record & Disk Management
- 8 Playback & Backup
- 9 Alarm Management
- 10 Account & Permission Management
- 11 Device Management
- 12 Remote Surveillance
- Appendix A FAQ
- Appendix B Calculate Recording Capacity
- Appendix C Compatible Device List

Device Management
DVR User Manual
89
Check “Enable” and then select the DDNS type. Input the server address, domain name,
username and password according to the selected DDNS type. Click “Test” to test
the effectiveness of the input information. Click “Apply” to save the settings.
You will have to input the server address and domain name if some DDNS types are selected.
Go to the relative DNS website to register domain name and then input the registered domain
information here).
11.1.5 E-mail Configuration
Click StartSettingsNetworkE-mail to go to the following interface. Input the sender’s
name, e-mail address, SMTP server and SMTP port (you can click “Default” to reset the SMTP
port to the default value) and then enable or disable the SSL and attaching image. Select the
username (the username list will be updated automatically according to the email address you
input) and input the password of the sender and then click “Apply” to save the settings (you
don’t have to enter the username and password if “Anonymous Login” is enabled). Click “Test”
to pop up a window. Input the e-mail address of the recipient in the window and then click the
“OK” button. The e-mail address of the sender will send an e-mail to the recipient. If the
e-mail is sent successfully, it indicates that the e-mail address of the sender is configured
correctly.