
User Manual
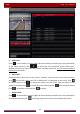
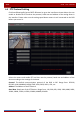


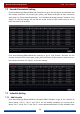
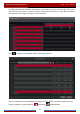
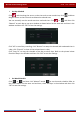
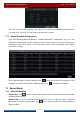
Table Of Contents
- Contents
- 1 Introduction
- 2 Basic Operation Guide
- 3 Wizard & Main Interface
- 4 Camera Management
- 5 Live Preview Introduction
- 6 PTZ
- 7 Record & Disk Management
- 8 Playback & Backup
- 9 Alarm Management
- 10 Account & Permission Management
- 11 Device Management
- 12 Remote Surveillance
- Appendix A FAQ
- Appendix B Calculate Recording Capacity
- Appendix C Compatible Device List

Record & Disk Management
DVR User Manual
50
7.2 Encode Parameters Setting
Click StartSettingsRecordEncode Parameters to go to the interface as shown below. Set
the encode, resolution, FPS, bitrate type, quality, max bitrate and audio of main stream for
each camera in “Event Recording Settings” and “Schedule Recording Settings” interfaces. Click
“Apply” to save the settings. You can set the record stream of each camera one by one or
batch set them for all cameras.
Click StartSettingsRecordStream Settings to go to “Sub Stream” interface. Set the
encode, resolution, FPS, bitrate type, quality and max bitrate of sub-stream for each camera in
the interface and then click “Apply” to save the settings.
7.3 Schedule Setting
7.3.1 Add Schedule
Click StartSettingsRecordRecord ScheduleEdit Schedules to go to the interface as
shown below. “24
ⅹ7”, “ 2 4ⅹ5” and “24ⅹ2” are the default schedules; you cannot edit or
delete “24ⅹ7” while “24ⅹ5” and “24ⅹ2” can be edited and deleted. Click the schedule name