
User Manual
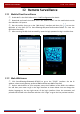
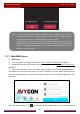
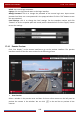

Table Of Contents
- Contents
- 1 Introduction
- 2 Basic Operation Guide
- 3 Wizard & Main Interface
- 4 Camera Management
- 5 Live Preview Introduction
- 6 PTZ
- 7 Record & Disk Management
- 8 Playback & Backup
- 9 Alarm Management
- 10 Account & Permission Management
- 11 Device Management
- 12 Remote Surveillance
- Appendix A FAQ
- Appendix B Calculate Recording Capacity
- Appendix C Compatible Device List

Remote Surveillance
DVR User Manual
97
12 Remote Surveillance
12.1 Mobile Client Surveillance
① Enable NAT in the DVR. Refer to 11.1.7 NAT Configuration for details.
② Download and install the mobile client “AVY Mobile CVMS” into the mobile device with
the Android or iOS system.
③ Run the mobile client, go to the “Add Device” interface and then click
to scan the
QR-Code of the DVR (Go to StartSettingsSystemInformationBasic to view the
QR-Code of the DVR).
④ After scanning the QR-Code successfully, input the login password to log in mobile client.
12.2 Web LAN Access
① Click StartSettingsNetworkTCP/IP to go to the “TCP/IP” interface. Set the IP
address, subnet mask, gateway, preferred DNS and alternate DNS of the DVR.
② Open a web browser on your computer, enter the IP address of the DVR in the address
bar and then press enter to go to the login interface as shown below. You can change the
display language on the top right corner of the login interface. Enter the username and
password of the DVR in the interface and then click “Login” to go to the live preview interface.