
User Manual

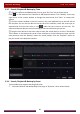
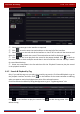
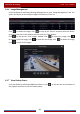
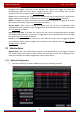
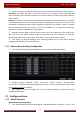
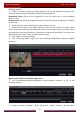
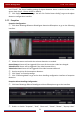
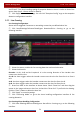
Table Of Contents
- Contents
- 1 Introduction
- 2 Basic Operation Guide
- 3 Wizard & Main Interface
- 4 Camera Management
- 5 Live Preview Introduction
- 6 PTZ
- 7 Record & Disk Management
- 8 Playback & Backup
- 9 Alarm Management
- 10 Account & Permission Management
- 11 Device Management
- 12 Remote Surveillance
- Appendix A FAQ
- Appendix B Calculate Recording Capacity
- Appendix C Compatible Device List

Playback & Backup
DVR User Manual
66
8.4.3 Search, Playback & Backup by Time
① Click StartSearch and BackupBy Time to go to “By Time” tab as shown below.
Click on the bottom of the interface to add playback camera. Click “Modify” on the top
right corner of the camera window to change the camera and click “Clear” to remove the
camera.
② Click the camera window to play the record in the small playback box on the left side of
the interface. You can set the date on the top left of the interface, check the event type as
required and click the time scale or click
under the time scale to set the time. The
camera window will play the record according to the time and event type you set.
③ Drag the color blocks on the time scale to select the record data (or click the “Set Backup
Time” button on the bottom left corner of the interface to set the backup start time and end
time) and then click the “Backup” button for record backup. Click the “Playback” button to
play the record in the playback interface.
8.4.4 Search, Playback & Backup by Event
Some models may support searching POS event.
① Click StartSearch and BackupBy Event to go to “By Event” tab as shown below.