
User Manual
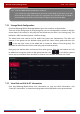
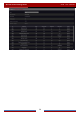


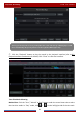
Table Of Contents
- Contents
- 1 Introduction
- 2 Basic Operation Guide
- 3 Wizard & Main Interface
- 4 Camera Management
- 5 Live Preview Introduction
- 6 PTZ
- 7 Record & Disk Management
- 8 Playback & Backup
- 9 Alarm Management
- 10 Account & Permission Management
- 11 Device Management
- 12 Remote Surveillance
- Appendix A FAQ
- Appendix B Calculate Recording Capacity
- Appendix C Compatible Device List

Record & Disk Management
DVR User Manual
55
7.5.1 Storage Mode Configuration
Click StartSettingsDiskStorage Mode to go to the interface as shown below.
There are all four disk groups. By using disk group, you can correspond the camera to disk (the
record data of the camera in the group will be stored into the disks in the same group). The
DVR with e-SATA interface supports e-SATA recording.
The added disks and cameras will be added into group one automatically. The disks and
cameras in the groups can be deleted except group one (select a disk group and then click
on the top right corner of the added disk or camera to delete it from the group). The
deleted disks and cameras will be moved into group one automatically.
Each group can add the disks and cameras from other groups. Each disk and camera can only
be added into one group. Select a disk group and then click in the disk or camera
row to pop up a window. Check the disks or cameras in the window and then click “Add”.
7.5.2 View Disk and S.M.A.R.T. Information
Click StartSettingsDiskView Disk Information to view the HDD information; click
“S.M.A.R.T. Information” to view the working status of the HDD. Refer to the picture below.
Note: 1. The new HDD should be formatted for normal use.
2. For normal use of the HDD which has been used in other DVR, if the DVR is of the same
model with the new DVR, please import the configuration file of the DVR to the new DVR or
format the HDD; if the models of the two DVRs are different, please format the HDD.