
User Manual
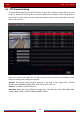
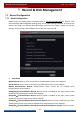

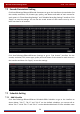
Table Of Contents
- Contents
- 1 Introduction
- 2 Basic Operation Guide
- 3 Wizard & Main Interface
- 4 Camera Management
- 5 Live Preview Introduction
- 6 PTZ
- 7 Record & Disk Management
- 8 Playback & Backup
- 9 Alarm Management
- 10 Account & Permission Management
- 11 Device Management
- 12 Remote Surveillance
- Appendix A FAQ
- Appendix B Calculate Recording Capacity
- Appendix C Compatible Device List

Record & Disk Management
DVR User Manual
54
7.4.2 Timing Recording
Timing Recording: the system will record automatically according to the schedule.
Set the timing record schedule of each camera. See 7.3 Schedule Setting
for details.
7.4.3 Motion Based Recording
Motion Based Recording: the system will start motion-based recording when the motion
object appears in the setup schedule. The setup steps are as follows:
① Set the motion-based recording schedule of each camera. See 7.3 Schedule Setting
for
details.
② Enable the motion and set the motion area of each camera. See 9.2.1 Motion
Configuration for details.
The camera will start motion-based recording once you finish the above settings.
7.4.4 Sensor Based Recording
① Set the sensor-based recording schedule of each camera. See 7.3 Schedule Setting for
details.
② Set the NO/NC type of the sensor, enable the sensor alarm and then check and configure
the “Record”. See 9.1 Sensor Alarm
for details.
7.4.5 Intelligence Recording
① Set the intelligence recording schedule of each IP camera. See 7.3 Schedule Setting for
details.
② Enable the intelligence detection (object detection, exception, line crossing or intrusion
detection) and draw alert surface or warning area of each IP camera. See
9.3 Intelligence
Alarm for details.
The camera will start intelligence recording once you finish the above settings. This function
is only available for some IPCs.
7.5 Disk Management
Click StartSettingsDiskDisk Management to go to disk management interface. You can
view the DVR’s disk number and disk status and so on in the interface. Click the “Formatting”
button to format the HDD.
Note: Click Start
Settings
Record
Mode Settings and then set the manual record time in the
interface. Click “Apply” to save the settings.