
User Manual
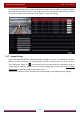
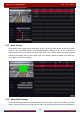
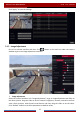
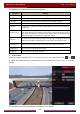
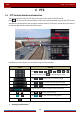
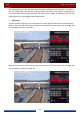
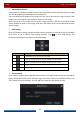
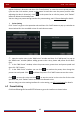
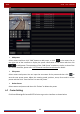
Table Of Contents
- Contents
- 1 Introduction
- 2 Basic Operation Guide
- 3 Wizard & Main Interface
- 4 Camera Management
- 5 Live Preview Introduction
- 6 PTZ
- 7 Record & Disk Management
- 8 Playback & Backup
- 9 Alarm Management
- 10 Account & Permission Management
- 11 Device Management
- 12 Remote Surveillance
- Appendix A FAQ
- Appendix B Calculate Recording Capacity
- Appendix C Compatible Device List

PTZ
DVR User Manual
42
Advanced 3D Control
Double click the left button of the mouse on any area of the camera image and then the image
size will be doubled and centered on the clicked point.
Press and hold the left button of the mouse on any area of the camera image to zoom in the
image; press and hold the right button to zoom out the image.
Move the cursor of the mouse to the camera image and then slide the scroll wheel of the
mouse forward to zoom in the image, slide the scroll wheel of the mouse backward to zoom
out the image.
OSD Setting
Go to PTZ protocol setting interface and then set the protocol to COC before you call the OSD.
Click “OSD” to go to camera OSD setting interface. Click
to start OSD setting. The
meanings of the buttons are shown in the table below.
Button Meaning
The OK button; you can click it to start OSD.
Click it to change the menu mode or decrease the menu value.
Click it to change the menu mode or increase the menu value.
Click it to go to the previous menu.
Click it to go to the next menu.
Preset Setting
Click “Preset” to go to preset operation tab and then click “Add” button to pop up a window as
shown below. Select the preset and then input the preset name in the window; finally click
“OK” button to save the settings. You can add 255 presets for each dome at most.