
User Manual
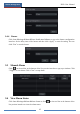
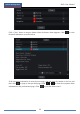


Table Of Contents
- Contents
- 1 Introduction
- 2 Basic Operation Guide
- 3 Wizard & Main Interface
- 4 Camera Management
- 5 Live Preview Introduction
- 6 PTZ
- 7 Record & Disk Management
- 8 Playback & Backup
- 9 Alarm Management
- 10 Account & Permission Management
- 11 Device Management
- 12 Remote Surveillance
- Appendix A FAQ
- Appendix B Calculate Recording Capacity
- Appendix C Compatible Device List

Account & Permission Management
DVR User Manual
71
10.3.2 Edit Permission Group
Go to “Edit Permission Group” interface and then click in the group list to edit the
permission group (the operations of the “Edit Permission Group” are similar to that of the “Add
Permission Group”, please see 10.3.1 Add Permission Group for details). Click to save
the group as another group. Click to delete the permission group. The three default
permission groups (“Administrator”, “Advanced” and “Common”) cannot be deleted.
10.4 Black and White List
① Click StartSettingsAccount and AuthoritySecurity to go to the following interface.
② Check “Enable” and then choose “Enable Allow List” or “Enable Block List” (the PC
client of which the IP address is in the allow list can access DVR remotely while the PC client
in the block list cannot).
③ Add IP/IP segment/MAC. Click “Add IP” or “Add MAC” button and then check “Enable”
in the popup window (only if you check it can the IP/IP segment/MAC you add be effective).
Enter the IP/IP segment/MAC and then click “OK” button. In the above interface, click
to edit IP/IP segment/MAC, click to delete it. Click “Apply” to save the settings.
10.5 View Online User
Click StartSettingsAccount and AuthorityUser Status to view the online user
information (you can view the online user name, login type, IP address and login time; click
to pop up a window showing the preview occupied channel number and playback occupied
channel number).