
User Manual
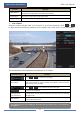

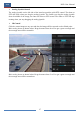
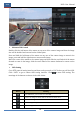
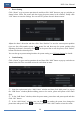

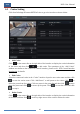

Table Of Contents
- Contents
- 1 Introduction
- 2 Basic Operation Guide
- 3 Wizard & Main Interface
- 4 Camera Management
- 5 Live Preview Introduction
- 6 PTZ
- 7 Record & Disk Management
- 8 Playback & Backup
- 9 Alarm Management
- 10 Account & Permission Management
- 11 Device Management
- 12 Remote Surveillance
- Appendix A FAQ
- Appendix B Calculate Recording Capacity
- Appendix C Compatible Device List

PTZ
DVR User Manual
39
Preset Setting
Click “Preset” to go to preset operation tab and then click “Add” button to pop up a window as
shown below. Select the preset and then input the preset name in the window; finally click
“OK” button to save the settings. You can add 255 presets for each dome at most.
Adjust the dome’s direction and then click “Save Position” to save the current preset position
(you can also click another preset in the preset list and then save the preset position after
adjusting the dome’s direction); click in the preset list to call the preset; click “Delete”
button to delete the selected preset.
You can also go to preset setting interface for preset setting, see 6.2 Preset Setting for details.
Cruise Setting
Click “Cruise” to go to cruise operation tab and then click “Add” button to pop up a window as
shown below left. You can add 8 cruises for each dome at most.
① Input the cruise name in the “Add Cruise” window and then click “Add preset” to pop up
the “Add Preset” window (Before adding preset to the cruise, please add preset of the dome
first).
② In the “Add Preset” window, select the preset name, preset time and preset speed and then
click “OK” button.
③ In the “Add Cruise” window, you can click to reselect the preset, then change the
preset time and speed. Click to delete the preset. Click “Add” button to save the cruise.