Room Alert 4E ™ Advanced IT & Facilities Environment Monitoring, Alerting & More Phone Fax Webal 401.628.1600 401.628.1601 AVTECH.com User’s Guide & Reference Manual 080 0.
Copyright Information Copyright 1988-2010 AVTECH Software Inc. All Rights Reserved. No part of this book may be used or reproduced for commercial benefit in any form or by any means, or stored in a database or retrieval system, without prior written permission of AVTECH Software Inc., except in the case of brief quotations embodied in articles and reviews.
Room Alert 4E Table of Contents Table Of Contents Introduction....................................................................................................................1 What Room Alert 4E Is............................................................................................................................1 Benefits Of Using Room Alert 4E............................................................................................................2 Installation...........
Room Alert 4E Table of Contents Motion Sensor.......................................................................................................................................19 Power Sensor.........................................................................................................................................19 Smoke Sensor.........................................................................................................................................19 Air Flow Sensor........
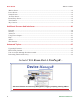
Room Alert 4E Introduction Introduction What Room Alert 4E Is The Room Alert 4E ID Box is one of AVTECH Software’s (AVTECH) hardware solutions for ‘Advanced Computer Room Environment Monitoring, Alerting & Automatic Corrective Action’. It is designed specifically to monitor 1-3 digital temperature or digital temperature/humidity sensors and 1 switch sensor in distributed locations spanning several hundred feet.
Introduction Room Alert 4E Give the IT staff and management “peace of mind” by keeping them fully informed of critical temperature changes regardless of where they are, the time of day or day of the week. Temperature extremes place an enormous stress on computer hardware and are normally caused by failure of the main air conditioning system or a loss of power. Extremes for even a short time can create major challenges for the IT staff and their budget.
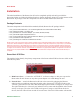
Room Alert 4E Installation Installation The initial installation of the Room Alert 4E can be completed quickly and easily provided the instructions below are followed with detail and care. Before beginning, please lay out the contents of the Room Alert 4E package so that the components can all be located and accessed with ease.
Room Alert 4E Installation Activity LED is blinking orange, please refer to the ‘Performing Firmware Recovery’ section of the ‘Advanced Topics’ chapter. This is an RJ-45 port. C. External Environment Sensor (Digital Sensor) — AVTECH’s Digital Temperature and Digital Temperature/Humidity Sensors can be connected to these sensor channels. This is an RJ-11 port. D.
Room Alert 4E Installation only if the Room Alert 4E unit is already connected to the network. Be sure to remove the sticker over the ‘Power’ port before attaching the ‘AVTECH 5V 1A Power Adapter’ to the Room Alert 4E unit. IMPORTANT NOTE: DO NOT CONNECT POWER to the Room Alert 4E unit during the initial setup UNTIL AFTER you have connected it to your network as described above or it will cause problems automatically assigning the initial IP address.
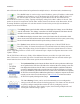
Installation Room Alert 4E units will cause the action selected to be performed on multiple units (i.e. all selected units) simultaneously. The ‘Set IP’ button is used to assign a static IP address, gateway IP address, subnet mask and DNS server IP address or to set the Room Alert 4E unit back to DHCP (0.0.0.0). If the ‘Set IP’ button is pressed without a specific Room Alert 4E unit selected in the AVTECH Device Discovery Utility, a prompt will display asking for the MAC address of the unit.
Room Alert 4E Installation The ‘Restore Settings’ feature is used to restore a saved configuration created using the ‘Save Settings’ feature to one or multiple Room Alert 4E units. When selected, the user will need to select from a previously saved ‘.bak’ file located in the ‘log’ folder of the ‘AVTECH Device Discovery Utility’ directory in order to restore or update the settings on the Room Alert 4E unit(s).
Room Alert 4E Installation screen of the Room Alert 4E unit and enter the IP address settings on the ‘Network’ tab. After doing so, click the ‘Save Settings’ button, wait 10 seconds and re-attach the Room Alert 4E unit to the network. Device Not Found Or Invalid IP Address If the Room Alert 4E is not discovered by the AVTECH Device Discovery Utility, the network may be blocking UDP broadcast packets on port 30718.
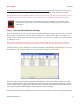
Room Alert 4E Installation Step 5: Check Room Alert 4E Firmware Version Open the AVTECH Device Discovery Utility and click the ‘Search’ button. When the Room Alert 4E unit is located, select it and click the ‘Web’ button. If you are unable to locate your Room Alert 4E unit because UDP broadcast packets are blocked on your network, simply type the IP address of the Room Alert 4E unit in the location bar of a web browser.
Configuration & Setup Screens Room Alert 4E Configuration And Setup Screens Alert Methods The Room Alert 4E unit can send alert notifications via email and email-to-SMS using anonymous SMTP relay and/or SNMP Traps. The Room Alert 4E unit is fully SNMP compliant and can be accessed by any application that can issue a SNMP Get request. Email The ‘SMTP Email’ section displays settings to allow Room Alert 4E to send Email Alert Notifications when alert thresholds are exceeded.
Room Alert 4E Configuration And Setup Screens Initial Email Setup First, check the ‘Email Enabled’ checkbox and enter the domain name or IP address of the mail server being used in the ‘Mail Server’ field on the ‘SMTP Email’ tab. Next, enter an email address in the ‘Return Address (From)’ field for an account that resides on the mail server being used. If SMTP authentication is required, check the ‘Enable Authentication’ checkbox and enter a valid username and password for the mail server.
Configuration & Setup Screens Room Alert 4E sending email to an email address, formatted in a way defined by the service provider being used for the target mobile device. For example, Verizon’s email address format for sending an email alert to a mobile device using SMS text messaging is ‘<10 digit mobile device number>@vtext.com’ with ‘<10 digit mobile device number>’ being replaced by the area code and phone number of the mobile device without dashes, spaces or a ‘1’ in front of the area code.
Room Alert 4E Configuration And Setup Screens SNMP Queries (SNMP Get) The ‘SNMP’ section displays settings allowing Room Alert 4E to respond to SNMP Query requests from network monitoring applications like Tivoli, OpenView, Unicenter and others. Enter the ‘Community Name’ to use for accessing the SNMP data via SNMP Query for the Room Alert 4E sensors. By default, the sensor values are returned in 4-digit format since SNMP does not support floating point numbers (i.e. 78.55 would be 7855).
Configuration & Setup Screens Room Alert 4E Alert Thresholds In order for alert notifications to be sent via email or SNMP Trap, alert thresholds must be configured for the sensors attached to the Room Alert 4E unit. Alert thresholds are configured on the ‘Internal’, ‘Digital’ sensors tab of the ‘Settings’ screen. Current sensor status will be displayed on the ‘Status’ screen of the TemPageR 3E web interface.
Room Alert 4E Configuration And Setup Screens Digital Sensors The alert thresholds for attached Digital Temperature Sensors are entered in the ‘Sensor # Alarm Configuration’ sections with ‘#’ representing the digital port number the sensor is connected to. Sensor 1 is the internal temperature sensor and Sensors 2 and 3 are the external temperature sensors. The sensor label for that corresponding sensor can be updated in the field below the ‘Sensor Label’.
Room Alert 4E Configuration & Setup Screens Sound, Light & Entry Sensor Room Entry Sensor Air Flow Sensor Panic Button Ping Options The ‘Ping Options’ section is used to configure up to eight (8) IP Addresses to perform a ‘ping’ on to see if they are available on the network. This provides a very simple way to ensure that critical devices are ‘up’. If a device does not respond to the ping within the specified timeout, an alarm is generated and an email alert is sent if configured.
Room Alert 4E Configuration And Setup Screens The primary advantage to keeping the lights illuminated is so it is easy to tell if an alarm occurred during off hours or when staff is not in a location that can see the light or hear the audible alarm. If a manager comes in on Monday morning and sees both the red and green lights illuminated, they know immediately that an alarm occurred over the weekend that has now cleared and they should check to see what caused the alarm.
External Sensor Options Room Alert 4E External Sensor Options Digital Temperature Sensor (TMP-SDT-SEN) The AVTECH Digital Temperature Sensor provides a real-time digital temperature reading at the location of the temperature probe. The temperature range is from -67° to 257° Fahrenheit and/or -55% to 125° Celsius. Accuracy is within +/- 0.5 degrees. This is an instant ‘plug & play’ sensor that connects to one of the external environment sensor channels via an RJ-11 cable.
Room Alert 4E External Sensor Options Motion Sensor (RMA-MOT-SEN) The AVTECH Motion Sensor allows a real-time notification of movement through a zone or across a path. This is an instant ‘plug & play’ sensor that connects to one of the switch sensor contact sets via a low voltage 2-wire cable. Power Sensor (RMA-PS1-SEN) The AVTECH Power Sensor allows a real-time notification of main power status change (i.e. power going on or off).
Additional Screens And Interfaces Room Alert 4E Additional Screens And Interfaces Network The ‘Network’ tab of the Room Alert 4E ‘Settings’ screen is used to update the network settings of the Room Alert 4E unit. The network settings can also be updated using the AVTECH Device Discovery Utility. To configure the Room Alert 4E unit to obtain an IP address automatically using DHCP, select the ‘Obtain IP Address Automatically’ radio button and click the ‘Save Settings’ button.
Room Alert 4E Additional Screens And Interfaces Advanced The ‘Advanced’ tab of the Room Alert 4E ‘Settings’ screen is used to configure the temperature scale, time zone, time display, daylight savings time setting, time server IP address and trace configuration options. The temperature scale selected in the ‘Temperature Scale’ drop down will be the default temperature scale to be used when entering alert thresholds and displayed on the ‘Status’ screen.
Additional Screens And Interfaces Room Alert 4E Using Trace Output Trace output is very useful for troubleshooting sending SMTP email and other issues. The trace output will show the communication between TemPageR and the configured mail server to show what might be preventing email from being sent. It will also show other information including the current version number, IP address, MAC address, requests to the web pages and much more.
Room Alert 4E Additional Screens And Interfaces About The Room Alert 4E ‘About’ screen provides general links and contact information for AVTECH sales, support and websites. The firmware version that is currently installed on the Room Alert 4E unit will also be listed with the date released directly below. The link entitled ‘Click Here To Check For Updates’ can be used to check if the firmware version installed on the Room Alert 4E unit is the most current (requires internet access).
Additional Screens And Interfaces Room Alert 4E of radio buttons for toggling between Fahrenheit and Celsius temperature displays. By default, the refresh interval for the ‘Status’ screen is set to every 60 seconds. To temporarily change this interval, enter a number of seconds in the ‘Update Every’ field and click outside the field. The default temperature scale displayed will correspond with the Fahrenheit or Celsius scale selected on the ‘Advanced’ tab of the ‘Settings’ screen.
Room Alert 4E Advanced Topics Advanced Topics Upgrading Firmware The Room Alert 4E firmware is upgraded using the AVTECH Device Discovery Utility and Room Alert 4E Firmware Update file. The latest version of these files can be obtained from the ‘Downloads’ section of the AVTECH.com website. If the AVTECH Device Discovery Utility is already installed on the computer being used for the upgrade, check for an updated version before downloading the Room Alert 4E Firmware Update file.
Advanced Topics Room Alert 4E Discovery Utility should still be able to update the firmware on it. To do so, click the ‘Upgrade’ button in the AVTECH Device Discovery Utility without anything selected. Enter the IP address of the Room Alert 4E unit to be upgraded and click the ‘Ok’ button. Navigate to the location where the Room Alert 4E Firmware Update file was saved, select it and then click the ‘Upload’ button. A dialog will then load asking for confirmation of the firmware upload.
AVTECH.com Protect Your IT Facility...