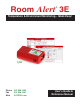
Room Alert 3E ® Temperature & Environment Monitoring... Made Easy! Phone Fax Web 401.628.1600 401.628.1601 AVTECH.com User’s Guide & Reference Manual 130215.
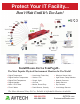
Protect Your IT Facility... Don’t Wait Until It’s Too Late! Monitor, Alert... Log, Graph... View, Respond... Report, Plan! Install Room Alert & TemPageR...
On behalf of the entire team at AVTECH, we say, “Thank You!” It is our privilege to serve you, our valued customer.
Copyright Information Copyright 1988-2013 AVTECH Software Inc. All Rights Reserved. No part of this book may be used or reproduced for commercial benefit in any form or by any means, or stored in a database or retrieval system, without prior written permission of AVTECH Software Inc., except in the case of brief quotations embodied in articles and reviews.
Room Alert 3E Table of Contents Introduction To Room Alert 3E .......................................................................................................3 Room Alert 3E Package Contents....................................................................................................4 The Room Alert 3E ID Box .......................................................................................................4 Front ............................................................................
Room Alert 3E Help ..........................................................................................................................................32 About........................................................................................................................................33 Updating & Troubleshooting Your Room Alert 3E ......................................................................34 How To Download Firmware & Software Updates From AVTECH.com ............................
Room Alert 3E Introduction To Room Alert 3E The Room Alert 3E monitor is AVTECH’s most compact and economical hardware solution for Temperature & Facilities Environment Monitoring . . . Made Easy.
Room Alert 3E Room Alert 3E Package Contents The standard Room Alert 3E package includes: • One (1) Room Alert 3E ID Box • One (1) Room Alert 3E User’s Guide & Reference Manual (You’re reading it now.
Room Alert 3E Ethernet Port An RJ-45 PoE-enabled port connects Room Alert 3E to your network via an RJ-45 network cable. Back Reset Button A small push button resets Room Alert 3E to factory default settings. Switch Sensor Channel A pair of dry contacts connects Room Alert 3E to any AVTECH switch sensor or dry contact on a device (e.g., HVAC, generator, pump, fan, etc.) via standard speaker wire or low-voltage 2-wire cable.
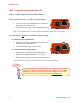
Room Alert 3E How To Install Your Room Alert 3E Step 1: Connect your Room Alert 3E hardware. If your network is Power over Ethernet (PoE) enabled . . . • Connect one end of a standard Ethernet cable to the Room Alert 3E’s Ethernet port. • Connect the other end to a PoE-enabled network jack. That’s it! Your Room Alert 3E is now powered and discoverable on your network. If your network is not Power over Ethernet (PoE) enabled . . . A. Connect to your network first.
Room Alert 3E Step 2: Open your Room Alert 3E in your web browser . . . With the built-in interface. • Enter your Room Alert 3E’s IP address in your web browser’s address bar to access the interface. OR With Device ManageR for advanced functionality. • Download and install AVTECH’s Device ManageR via your customer account at AVTECH.com/Downloads. • Launch it in your web browser at http://localhost:8080.
Room Alert 3E How To Use Room Alert 3E’s Web Interface You may configure your Room Alert 3E through its built-in web interface. To access the interface, you may either: • Select your Room Alert 3E in Device ManageR and click the “Open Web” button. or • Type the IP address of your Room Alert 3E monitor directly into the address bar of your web browser.
Room Alert 3E Current Sensor Status Bar Below the “Status” tab is the “Current Sensor Status Bar,” where you may view basic information about your Room Alert 3E and make temporary adjustments to the sensor display. • You may find your Room Alert 3E’s name, current date & time, and MAC address here. • To determine if your Room Alert 3E’s firmware is current, you may click Room Alert 3E vX.X.X at the right. TIP Your Room Alert 3E must be connected to the internet to check firmware versions.
Room Alert 3E Sensor Display Area In the main viewing pane of the “Status” tab is the “Sensor Display Area.” Here you may view the current readings for your sensors, which are displayed left to right as follows: Channel 1: Internal Temperature Sensor Channel 2: External Digital Sensor Channel 3: External Switch Sensor Below the channels, you see the status icons and the labels for your sensors, which you may configure in Settings Æ Sensors. Status Icons Green circle with “9” mark….......
Room Alert 3E Settings To access your Room Alert 3E’s settings, click Settings in the navigation bar at the top of your screen. TIP You’ll see a prompt for your username and password whenever you click Settings. If you have not set up a password for your Room Alert 3E, simply click OK without entering anything. AVTECH Software, Inc.
Room Alert 3E Network Navigate to Settings Æ Network to open the “Network Settings” screen. Device Name To rename your Room Alert 3E: 3. Select the automatically-assigned name in “Device Name” and enter a new one of up to 15 alphanumeric characters. 4. Click Accept Changes at the bottom of your screen. 5. Click Save Settings in the navigation bar to the left of your screen. IP Address Configuration—DHCP To obtain an IP address automatically using DHCP: 1. Select Obtain IP Address Automatically. 2.
Room Alert 3E IP Address Configuration—Static IP To assign a static IP address: 1. Select Use The Following IP Configuration. 2. In “IP Address,” enter the new static IP address. 3. In “Subnet Mask,” enter the subnet mask. 4. In “Default Gateway,” enter the gateway IP address. 5. In “DNS Server IP,” enter the DNS server IP address. 6. Click Accept Changes at the bottom of your screen. 7. Click Save Settings in the navigation bar to the left of your screen.
Room Alert 3E Ethernet Configuration Typically, you may leave the “Ethernet Configuration” section at the defaults, which are shown below, for immediate use of Room Alert 3E. However, if you connect your Room Alert 3E to a managed switch that controls your network traffic, you may need to change these settings: 1. In “MTU Size,” you may leave the default, 1024, or enter a value as low as 512. 2. You may uncheck “Auto Negotiate” and choose: • For “Speed,” 100 Mpbs or 10 Mbps.
Room Alert 3E SMTP Email You may configure your Room Alert 3E to send alerts via email and email-to-SMS. Navigate to Settings Æ SMTP Email to open the “Email Settings” screen. 1. Check Email Enabled. 2. Leave the Email Footer Enabled checked to include AVTECH contact information with email messages. 3. Check Use SMS to send a shorter email with a reduced character count. 4. In “Mail Server Port,” enter your mail server’s SMTP port. The default is 25, a commonly-used port. 5.
Room Alert 3E Authentification (Optional) 9. If your mail server requires SMTP authentication, check Enable Authentification. 10. In “Username” and “Password,” enter a valid username and password for your mail server that will facilitate authentification. TIP Your password cannot be more than 11 alphanumeric characters. Email Recipients (Separated By Comma) 11. In “Email Addresses,” enter the email and email-to-SMS addresses that you’d like to send alerts to. Separate each address with a comma.
Room Alert 3E Simple Network Management Protocol (SNMP) Because your Room Alert 3E is fully SNMP-compliant, you have the option to monitor it with a 3rd-party monitoring application capable of performing SNMP queries. You may configure the Room Alert 3E to send SNMP Traps in response to a change in alarm states to up to three host systems running 3rd-party SNMP monitoring applications.
Room Alert 3E SNMP Configuration To begin configuring your Room Alert 3E for SNMP: 1. In “Community Name,” you may leave the default SNMP protocol community name— “public”—or enter a new name. TIP The community name you assign here must match the one in your 3rd-party SNMP monitoring application. 2. You may leave “Contact (sysContact)” blank or enter a person’s name to specify who is receiving the information. 3.
Room Alert 3E SNMP Trap Sending Configuration You may configure your Room Alert 3E to send SNMP Traps in response to a change in alarm state to up to three host systems running 3rd-party SNMP monitoring applications. Each host system you enter in these fields will receive the same SNMP Traps simultaneously. To configure your Room Alert to send SNMP Traps: 1. In “Trap Send IP 1,” enter the IP address of the host system that runs your 3rd-party SNMP monitoring application. 2.
Room Alert 3E Navigate to Settings Æ Sensors to open the “Sensor Settings” screen. This sample screen shows all three sensors connected to the Room Alert 3E before they have been configured. Sensor 1 Alarm Configuration (Internal Temperature Sensor) You may configure alert thresholds for the Internal Temperature Sensor in the “Sensor 1 Alarm Configuration” fields. The temperature range is -40° to 185° F (-40° to 85° C). 1.
Room Alert 3E NOTE Refer to the Advanced section in this manual for instructions on setting the default temperature scale. 3. Enter values in the “High” and “Low” field to set high and low temperature thresholds. 4. Enter a value in the “Adjust” field to calibrate the Internal Temperature Sensor if its reading differs from a known temperature value at that location. 5. Click Accept Changes at the bottom of your screen. 6. Click Save Settings in the navigation bar to the left of your screen.
Room Alert 3E 3. Enter values in the “High” and “Low” field to set high and low thresholds. Your Room Alert 3E will send an alert email or email-to-SMS in response to these temperatures. 4. Enter a value in the “Adjust” field to calibrate your digital sensor if its reading differs from a known value at that location. 5. Click Accept Changes at the bottom of your screen. 6. Click Save Settings in the navigation bar to the left of your screen.
Room Alert 3E 3. Now put the sensor into an alarm state. (To put a Motion Sensor into an alarm state, for example, wave your hand in front of it.) Look at the current status at the same time. You should see the current status switch to the opposite of normal. In this example, if normal is “Closed,” you see the alarm state as “Open.” Now that you’ve checked what “Open” and “Closed” mean on your switch sensor, navigate to Settings Æ Sensors to configure your options in “Sensor 3 Alarm Configuration”: 1.
Room Alert 3E Advanced Sensor Configuration Check Trigger Alarm If Sensor Is Disconnected? if you want to receive an alert if the external digital sensor becomes disconnected from the Room Alert 3E. This check box is blank by default. Alarm Options You need to configure the “Alarm Options” page only if you use a Light Tower & Relay Adapter with your Room Alert 3E, which gives you the option to add an AVTECH Light Tower, Light Tower w/Audio or Relay Switch Sensor.
Room Alert 3E Navigate to Settings Æ Alarm Options to open the “Alarm Options” screen. This sample screen shows the options for a Light Tower w/Audio before it has been configured. 1. In “Connected Light Tower / Relay,” select from the 4 choices in the drop-down menu. TIP The options on this screen vary somewhat depending on the device you select from the drop-down list. AVTECH Software, Inc.
Room Alert 3E 2. If you want to enable the Light Tower or Relay Switch Sensor to perform an action when your Room Alert 3E returns to a “clear” state, click Alarm Clear Action. 3. In “Action To Perform When Alarms Occur,” you may leave the default “OFF,” or click the check box to select “ON” for each item. 4. In “Action To Perform When Alarms Clear,” you may leave the default, “OFF,” or click the check box to select “ON” for each item. 5. Click Accept Changes at the bottom of your screen. 6.
Room Alert 3E Security By default, the Room Alert 3E does not require log in credentials; you may, however, create a password for your Room Alert 3E for extra security. Navigate to Settings Æ Security to open the “Security Settings” screen. 1. In “Web Password,” you may create a log in password of up to 15 alphanumeric characters for your Room Alert 3E. TIP Use only letters and numbers in your log in password—no special characters, please. 2.
Room Alert 3E Advanced You may configure a number of advanced options here, including the default temperature scale (Fahrenheit or Celsius), status page settings, Device ManageR “Push” settings, time & date, and trace output. Navigate to Settings Æ Advanced to open the “Advanced Settings” screen. 28 AVTECH Software, Inc.
Room Alert 3E Temperature Scale Configuration You may select the default temperature scale for your Room Alert 3E here. 1. Select Fahrenheit or Celcius. 2. Click Accept Changes at the bottom of your screen. 3. Click Save Settings in the navigation bar to the left of your screen. Status Page Configuration You may set defaults for the “Status” screen here. 1. In “Refresh Rate (seconds),” enter the number of seconds you would like the “Status” screen to refresh at. You may enter a value from 1 to 65535.
Room Alert 3E • Your Room Alert 3E can immediately send an update to Device ManageR when it detects an alarm, regardless of any intervals you have configured either in this section or in the Device ManageR discovery interval. To enable Push to Device ManageR from your Room Alert 3E: 1. Select Enable Device ManageR Push. 2. In “Server IP Address,” enter the IP address of Device ManageR’s host system. 3. In “Server Port,” enter the port Device ManageR uses. The default is 8080. 4.
Room Alert 3E 3. In “Time Format,” you may select either MM/YY/DD or DD/YY/MM format. Month first is the default. 4. Select Daylight Savings if you would like your Room Alert 3E time setting to compensate by +1 hour for daylight savings time. 5. In “Time Server IP,” you may leave the default of 198.82.1.201 or enter the IP address of another NTP time server on your network. 6.
Room Alert 3E Help Click the Help tab to open the “Room Alert 3E Help” screen, which provides helpful links and contact information for AVTECH support resources. You may find the version number and release date of the firmware that is installed on your Room Alert 3E on this screen. To check if your Room Alert 3E has the most current version, click Click Here To Check For Updates. TIP 32 Your Room Alert 3E must be connected to the internet to check for newer firmware versions. Thank you.
Room Alert 3E About Click the About tab to open the “Room Alert 3E About” screen, which provides helpful links and contact information for AVTECH sales and support resources. You may find the version number and release date of the firmware that is installed on your Room Alert 3E on this screen. To check if your Room Alert 3E has the most current version, click Click Here To Check For Updates. TIP Your Room Alert 3E must be connected to the internet to check for newer firmware versions. Thank you.
Room Alert 3E Updating & Troubleshooting Your Room Alert 3E How To Download Firmware & Software Updates From AVTECH.com Software and firmware updates are available to licensed customers with current “Maintenance Support & Update Service” (MSUS). To download: 1. Go to AVTECH.com/Downloads, or click Downloads on the menu bar at the top of the screen at AVTECH.com. 2.
Room Alert 3E TIP IMPORTANT: Be sure that there are no web browsers accessing your Room Alert 3E monitor from anywhere on your network before uploading the firmware as this could cause the firmware update to be incomplete or become corrupted. How To Discover Room Alert 3E When Your Network Blocks UDP Broadcasts If your network blocks UDP broadcast packets on port 30718, AVTECH’s Device ManageR might not be able to automatically locate the Room Alert 3E monitor.
Room Alert 3E 2. Click Reset Defaults in the navigation bar to the left. 3. Click Yes when prompted with “Are you sure you want to Reset Factory Defaults?” 4. Your Room Alert 3E will automatically reboot and attempt to obtain an IP address via DHCP. 5. To automatically discover your Room Alert 3E on your network, open AVTECH’s Device ManageR. (If you don’t already have it installed, download it from your customer account at AVTECH.com/Downloads.
Room Alert 3E Introduction To AVTECH’s Device ManageR Device ManageR is AVTECH’s all-in-one software solution for the discovery, management, monitoring, alerting, logging, graphing, automatic action and more of AVTECH’s physical environment monitoring hardware and Axis network cameras. Manage Unlimited Room Alert & TemPageR Montiors 9 Control all of your Room Alert and TemPageR units from a single web browser interface, accessible from anywhere by internet.
IT & Facilities Environment Monitoring Made Easy! Digital Sensors are those that monitor in real-time to provide digital values that can be viewed through a web or application interface, passed in alert notifications or logged for creating charts and graphs. Common digital sensors include Temperature; Outdoor Temperature; Fluid Temperature; and Temperature & Humidity. ST BE S Digital Temperature Sensor • Real-time temperature sensor. • Max sensor cable distance up to 100´, includes 25´.
ST BE Flood Sensor w/8´ Cable 8´ Flood Cable Extension 15 50 $2 R LE L SE IT & Facilities Environment Monitoring Made Easy! $1 AVTECH Sensors • Real-time recognition of water/flood anywhere along the length of the patented flood cable. • Real-time recognition of water/flood anywhere along the length of the patented flood cable. • 8´ Flood Cable with 25´ RJ-11 leader cable. • Can be extended by adding additional 8´ extensions. • Alert triggered when sensor is activated or power lost.
BE Air Flow 1 Sensor (NC) Air Flow 2 Sensor (NO) 0 0 $4 ST R LE L SE IT & Facilities Environment Monitoring Made Easy! $4 AVTECH Sensors • Real-time recognition of air flow stop/start. • Real-time recognition of air flow stop/start. • Use in HVAC duct, under raised floors, or near fan. • Use in HVAC duct, under raised floors, or near fan. • Max sensor cable distance up to 900´, includes 25´. • Max sensor cable distance up to 900´, includes 25´.
IT & Facilities Environment Monitoring Made Easy! • Light Tower lights turn on when alarms are detected (i.e. pings fail, high temps, etc.). 79 $2 ST BE R LE 50 • Light Tower lights turn on when alarms are detected (i.e. pings fail, high temps, etc.). • Lights turn on/off via SNMP set, URL & interactively via AVTECH’s Device ManageR software. • Lights turn on/off via SNMP set, URL & interactively via AVTECH’s Device ManageR software. • Includes 3´ Light Cable; no extension cable available.
NOTES: ____________________________________________________________________ ______________________________________________________________________________ ______________________________________________________________________________ ______________________________________________________________________________ ______________________________________________________________________________ ______________________________________________________________________________ _________________________________________
How To Purchase AVTECH Products AVTECH products are available for purchase around the world and used in 106 countries, on Antarctica and in space. You can purchase through your favorite reseller *, direct from AVTECH, or online through our store. When ordering from AVTECH, we are happy to accept your organization’s purchase order (PO), as well as payment via credit card or wire transfer. All orders ship the same or next business day.
AVTECH.com Protect Your IT Facility...