
Operation Manual
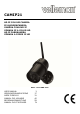

CAMIP21
V. 02 – 01/07/2015 4 ©Velleman nv
QR code iTunes QR code Google Play
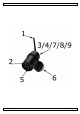
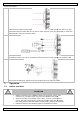
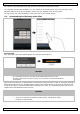
5. Overview
Refer to the illustrations on page 2 of this manual.
1
antenna
6
camera stand
2
IR LEDs
7
memory card slot
3
signal indicator
8
RJ45 connector
4
power indicator
9
power cable/reset button
5
motion sensor
6. Camera Installation
6.1 Guidelines
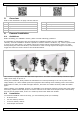
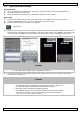
Before installing your CAMIP21 camera, please consider following guidelines:
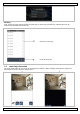
It is advisable to spend some time and choose the installation location for your CAMIP21 camera
carefully. Avoid an installation location exposed to extreme weather conditions, e.g. under a gutter which
is prone to any water leaks, or a location where the camera will be pointed directly at the sun. Also,
avoid pointing the camera at bushes, tree branches or other moving objects that might unnecessarily
trigger the camera to record. Refer to the illustration below.
correct wrong
This camera is equipped with LEDs that allow night vision. The LEDs will automatically activate at night.
Night vision range is up to 5 m.
During the installation, always follow the manufacturer’s advice pertaining to the use of power tools,
steps, ladders, etc. Wear suitable protective equipment and clothing when handling power tools. Before
drilling holes in walls, use a cable and pipe detector, and check for hidden electricity cables and water
pipes.
When installing your CAMIP21 camera, it is advisable to use electrical conduit to protect the power cable
from being exposed externally and/or to reduce chances of the cable to be tampered with. After drilling
the hole for the power cable, ensure it is sealed up around the cable with sealant.
6.2 Installation
To install the CAMIP21 camera correctly, you need following tools (not included):
•
an electric drill
•
a 5 mm masonry drill bit
•
a 15 mm masonry drill bit
•
a #2 Phillips screwdriver