
User Guide


Copyright Avolites Limited 2010
Page 138 – 13. Networking
PearlExpertTitan_Man_v3.doc 29/03/2010 13:28:00
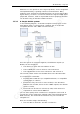
The network link connection can be made through either a crossover
cable, or through a network hub.
For this example, both computers are connected together via a
crossover cable.
First, we will set up the Network setting for both computers. It is
important that both computers use an IP address in the same range
(2.0.0.x in this example) and have the same subnet mask, or they
won’t be able to communicate.
On the Pearl, set the address to 2.x.x.x as described in section
13.1.1
at the start of this chapter. If you need to set a custom address to
match the visualiser PC you can use Control Panel to do this.
On the computer running the Visualiser:
1> Click Start, Control panel, Network connections.
2> Right click on the connection you wish to use.
3> Click Properties.
4> In the connection properties window select TCP/IP and click
Properties
5> Set the PC network adapter to a free address on the network in
the range 2.0.0.x.
6> Set the subnet mask to 255.0.0.0.
7> Click OK.
Close any network windows on both machines.
Install and run ACDI on the Visualiser Computer.
In ACDI change "Source" to "Simulator"
Do not close the ACDI window
Refer to the previous section,
13.2.1, to setup a DMX line on the
Pearl to be sent to the Visualiser.
Finally, start the Pearl, and open or create the theatre file. (See the
Visualiser manual for more information on this)
Once ready to connect to the Pearl, go to run mode in the Visualiser,
and select simulator under DMX.
The Pearl should now be working with the Visualiser.
Computer
running
Pearl
Simulator