
Operator`s manual


Page 218 – 14. Networking the console
TitanUniversal_Man_v7-0_PE.doc 02 September 2013
Close any network windows on both machines.
Install and run ACDI on the Visualiser Computer.
In ACDI change "Source" to "Simulator"
Do not close the ACDI window
Refer to the previous section to setup a DMX line on the console to be
sent to the Visualiser.
Finally, start the console, and open or create the theatre file. (See the
Visualiser manual for more information on this)
Once ready to connect to the console, go to run mode in the
Visualiser, and select simulator under DMX.
The console should now be working with the Visualiser.
14.3 Module Setup
A module is a method of sending DMX and can be thought of as a
collection of nodes.
For example, consider using wireless networking technology to
transmit DMX to several individual receivers. Each receiver is
configured to output a specific universe of DMX. In this case, the
wireless system as a whole is the module, and each receiver is a
node.
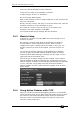
You can set the specific properties of the Modules used with the
console by going to the DMX Settings window (switch to System
mode and select [DMX Settings]) and then click the small ‘i’ at the
right hand side of the module name.
This allows you to adjust settings for each module, and to select a
network adapter for ACDI and Art-Net. The consoles only have one
network adapter, however on Titan Mobile and Simulator this depends
on your computer; many laptop users will have their standard
network adapter and also a Wi-Fi (wireless) adapter, both of which
will be shown.
14.4 Using Active Fixtures with CITP
CITP is a standard system allowing lighting devices to communicate
and share information. This is often used with media servers to allow
the console to get media thumbnail images and layer information
from the server. The thumbnail images can then be used on the
console to select media clips.