
Operator`s manual


9. Cue Lists - Page 169
TitanUniversal_Man_v7-0_PE.doc 02 September 2013
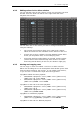
To set times for an attribute group, first select the Set Times menu
and go to the cue you want to set as described above, then press G
[Next] to go to the second page of options.
1> Press C [Attribute times].
2> All fixtures in the cue will be selected. If you don’t want to
change the times for any fixtures, deselect them now. You can
press the ALL button (below Next Time) to select all fixtures in
the cue or Shift+ALL to deselect all fixtures.
3> Press the softkey for the attribute group you want to change.
4> Press A [Delay] to set the delay time, or press B [Fade] to set
the fade time. Press G [Use global] to remove the attribute
group timing and go back to the normal delay/fade times for
the cue.
• You can use [Individual Attributes] to set times for one attribute
within the group, for example just Pan from within the Position
group. You can also use the Cue View window to set times for
individual attributes.
9.5.4 Fixture overlap
For each cue you can set a (linked together) fixture overlap, which
causes
the Pearl Expert to apply the settings in the cue to each
fixture sequentially giving a “rolling” change across the fixtures in the
cue. This can create some great effects without much programming
on your part.
• Press A [Fixture Overlap] (on the second page of the Cue Times
menu) then enter 0-100 on the keypad to change how fixtures
overlap in the cue. 100% means all fixtures fade together (the
normal setting). 0% means that the first fixture will finish its
fade before the next one starts. 50% means that the 2
nd
fixture
will start fading when the first one is half way through its fade.
• To change the fixture order when using overlap, press D [Set
Fixture Order]. Normally this is the order in which you selected
the fixtures when you programmed the cue. The Fixture window
shows the fixture order in large green numbers. Reorder the
fixtures by pressing A [Step Number] then type the start
number on the numeric keys, then press the fixture Select
buttons in the order you want them. For example, to set the
order of 8 fixtures, press 1 on the keypad, then press the Select
button of the fixture to be first, then the Select button for the
second, and so on. You can set several fixtures to the same
number if you want them to change simultaneously.
If you press a fixture button twice, it will show X and be
excluded from the sequence.