Single port PS2 KVM over IP Single Port PS/2 KVM over IP SWITCH Preliminary USER’S MANUAL Rev 1.
Single port PS2 KVM over IP TABLE OF CONTENTS 1. THE QUICK INSTALLATION GUIDE 2. INTRODUCTION 2.1 When the sever is up and running 2.2 When the server is dead 2.3 FEATURES 2.4 PACKAGE CONTENTS 2.5 TECHNICAL SPECIFICATIONS 2.6 SYSTEM REQUIREMENT 2.7 CABLE DIAGRAMS PRODUCT DETAILS 3. HARDWARE INSTALLATION 3.1 Operation overview 3.2 Connecting PS/2 KVM over IP to the host system 4. CONFIGURATION 4.1 Initial configuration 4.1.1 Initial configuration via DHCP server 4.1.
Single port PS2 KVM over IP 5.4.5 Remote console type 5.4.6 Mouse hotkey 5.4.7 Button keys 5.5 Network settings 5.5.1 Dynamic DNS 5.6 Serial settings 5.6.1 Modern setting 5.7 User settings 5.8 Maintenance 5.8.1 PS/2 KVM over IP switch board summary 5.8.2 Maintenance Features 5.8.2.1 Event log 5.8.2.1.1 Event log setting 5.8.2.1.2 Log event assignments 5.8.2.2 Date/Time setting 5.8.2.3 Update Firmware 5.8.3 Reset function 5.8.4 Reset PS/2 KVM over IP switch 5.9 Access via Telnet 6. TROUBLESHOOTING 7.
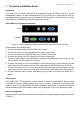
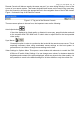
Single port PS2 KVM over IP 1. The Quick Installation Guide Installation PS/2 KVM over IP switch redirects local keyboard, mouse and video data to a remote administration console. All data is transmitted via IP. PS/2 KVM over IP switch can be used in a multi administrator and multi server environment as well. Besides this, PS/2 KVM over IP switch is a KVM switch, which can also be used with a local console. PS/2 KVM over IP hardware installation Host Console Figure 1.
Single port PS2 KVM over IP Parameter Value IP auto configuration DHCP — IP-Address Net-mask 255.255.255.0 Default-Gateway none IP access control disabled Table 1.1: Initial configuration If this initial configuration doesn’t meet your local requirements, you need to do the initial IP configuration. Use one of the following ways: 1. Connect the enclosed NULL modem cable to the serial interface on the rear side. The serial interface needs to be adjusted with the parameters shown in table 1.
Single port PS2 KVM over IP Remote Console will behave exactly the same way as if you were sitting directly in front of the screen of your remote system. That means keyboard and mouse can be used in the usual way. Open the console by choosing the appropriate link in the navigation frame of the HTML fronted. Figure 1.2 shows the top of the Remote Console. Figure 1.
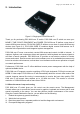
Single port PS2 KVM over IP 2. Introduction Figure 2.1 Single port PS/2 KVM over IP Thank you for purchasing PS/2 KVM over IP switch. PS/2 KVM over IP switch can save your MONEY, TIME, SPACE, EQUIPMENT and POWER. PS/2 KVM over IP defines a new class of remote KVM access devices. PS/2 KVM OVER IP defines a new class of remote KVM access devices (see Figure 2.1). PS/2 KVM OVER IP combines digital remote KVM access via IP networks with comprehensive and integrated system management.
Single port PS2 KVM over IP 2.2 When the server is dead Obviously, fixing hardware defects is not possible using a remote management device. Nevertheless PS/2 KVM over IP gives the administrator valuable information about the type of a hardware failure. Serious hardware failures can be categorized into five different categories with different chances to happen: I. Hard disk failure 50% II. Power cable detached, power supply failure 28% III. CPU, Controller, main board failure 10% IV. CPU fan failure 8% V.
Single port PS2 KVM over IP 2.4 Package contents Base unit- Single port PS/2 KVM over IP Switch 1 PCS User’s manual 1 PCS Installation and User Manual on CD-ROM 1 PCS AC to DC Power Adapter 1 PCS Rack Mount Kit 1 SET Null modem cable 1 PCS 2.5 Technical specifications Model No.
Single port PS2 KVM over IP 2.6 System requirement Model No. Local console side Single port PS/2 KVM over IP Switch One Keyboard, one Mouse and one monitor Remote Console side One PC is linked into the network Computer side One PC or Server or the console port of KVM switch unit 2.
Single port PS2 KVM over IP 3. Hardware installation 3.1 Operation Overview Figure 3.1 shows the connections of PS/2 KVM over IP switch to its host, to peripheral devices, to the power source and to the local area network. Figure 3.1: PS/2 KVM over IP switch usage scenario PS/2 KVM over IP switch redirects local keyboard, mouse, and video data to a remote administration console. All data is transmitted via IP. PS/2 KVM OVER IP can be used in a multi administrator and multi server environment as well.
Single port PS2 KVM over IP Step 3 Connect the keyboard to the PS/2 KVM over IP switch console side. Step 4 Connect the mouse to the PS/2 KVM over IP switch console side. Step 5 Connect a VGA cable (15-pin HDDB Male / Male) with the Male side to both of the PC and the host of the PS/2 KVM over IP switch. Step 6 Connect one end to the PS/2 mouse port on the computer, and the other end to the host PS/2 mouse port on the PS/2 KVM over IP Switch.
Single port PS2 KVM over IP . Avocent.SPC1 800/1600 . Sentry In-Line Power Module . Leuning ePowerSwitch 3.2.2 Connecting Ethernet The rear side of PS/2 KVM over IP switch provides a RJ-45 connector for Ethernet. The connector is used either for a 100 Mbps 100BASE-TX connection or for a 10 Mbps 10BASE-T connection. The adapter can sense the connection speed and will adjust to the appropriate operation mode automatically. 3.2.2.
Single port PS2 KVM over IP DHCP connection fails on boot up, PS/2 KVM over IP switch will not have an IPv4 address. 4.1.2 Initial configuration via serial interface PS/2 KVM over IP switch has a serial line interface at its rear side. The connector is compliant to RS 232 serial line standard. The serial line has to be configured with the parameters given in Table 4.2. Parameter Value Bits/second 115200 Data bits 8 Parity No Stop bits 1 Flow Control None Table 4.
Single port PS2 KVM over IP over IP switch works with accelerated mice and is able to synchronize the local with the remote mouse pointer (see Section 5.3.3), there are the following limitations which may prevent this synchronization from working properly: Special Mouse Driver - There are mouse drivers, which influence the synchronization process leading to desynchronized mouse pointers.
Single port PS2 KVM over IP that leads you to information on how to upgrade your browser to a state of the art encryption scheme. Figure 5.1 shows the dialog presented by Internet Explorer 6.0. However the US export regulations have been declared obsolete recently. Therefore, new browser versions do support strong encryption. We recommend the following browser for a secured connection to PS/2 KVM OVER IP. Microsoft Internet Explorer version 5.
Single port PS2 KVM over IP Figure 5.2 PS/2 KVM over IP switch login screen The PS/2 KVM over IP switch has a built-in super user that has all permissions to administrate your PS/2 KVM over IP switch: Login name Password Attention: Please make sure to change the super user password immediately after you have installed and firstly accessed your PS/2 KVM over IP switch.
Single port PS2 KVM over IP Figure 5.3: PS/2 KVM over IP switch home menu window The upper left frame contains a home link that brings you instantly back to the home page after you stepped down to one of the administration menu points. The logout link logs you out of PS/2 KVM over IP switch. That means the current session will be terminated and you have to type username and password again to login.
Single port PS2 KVM over IP Telnet interface please refer to 5.9. Remove Console This picture contains the current video buffer content. That means, Preview it shows what is actually displayed on the desktop of the remote host. You can click on the picture to open the Remote Console. Server Power If serial port is set to IP-Power, the status of the power box is shown Status “On”. In this case, there is also a button to switch the state of the connected power box.
Single port PS2 KVM over IP With respect to the keyboard, the very exact remote representation might lead to some confusion as your local keyboard changes its keyboard layout according to the remote host system. For instance, special keys on the German keyboard won’t work anymore as expected but will result in their US English counterpart if you are using a German administration system but your host system uses a US English keyboard layout.
Single port PS2 KVM over IP connection error, it will be displayed in this line as well. You can double click the state line in order to see a history (see Figure 5.5) of all the state messages. Figure 5.5 Shows history of all the state messages . Auto adjust Starts the auto adjustment procedure to determine the settings for best visual quality of the grabbed image. This may take a few moments. During the process the display is turned off and you will see a notification message. .
Single port PS2 KVM over IP activate the ’Exclusive Mouse Mode’ (see Section 5.3.5 for an explanation). . Options --Local Keyboard Used to change the language mapping of your browser machine running the Remote Console Applet. Normally the Applet determines the correct value automatically. However, depending on your particular JVM and your browser machine settings this is not always possible. A typical example is a German localized system that uses an US-English keyboard mapping.
Single port PS2 KVM over IP Intelligent Sync - If the fast sync doesn’t work or the mouse settings have been changed on the host system, use the intelligent resynchronization. This method takes more time than the fast one and can be accessed with the appropriate item in the Remote Console option menu. The intelligent synchronization requires a correctly adjusted picture. Use the auto adjustment function or the manual correction in the Video Settings panel (refer to Section 5.4.3) to setup the picture.
Single port PS2 KVM over IP 5.3.4.2 Video Settings through the remote console PS/2 KVM over IP switch features a panel to setup the following video options (see Figure 5.6), available in the Remote Console Options menu. Figure 5.6: Video Settings Panel Brightness Contrast Clock Controls the brightness of the picture Controls the contrast of the picture Defines the horizontal frequency for a video line and depends on the video mode. Different video card types may require different values here.
Single port PS2 KVM over IP Figure 5.7: Example of Remote Console settings All the settings for the Remote Console window are user specific. That means, each user can individually customize the Remote Console for his needs. Changing the settings for one user does not affect the settings for others. 5.4.1 SSL Settings Table 5.3 explains the possible adjustments related to the usage of SSL.
Single port PS2 KVM over IP Figure 5.8: Security settings Parameter Force HTTPS KVM encryption Description If this option is enabled access to the web front-end is only possible using an HTTPS connection. PS/2 KVM over IP switch won’t listen on the HTTP port for incoming connections. In case you want to create your own SSL certificate that is used to identify this PS/2 KVM over IP switch refer to Section 5.4.1.1.
Single port PS2 KVM over IP Certificate Signing Request generation. The CSR can be downloaded to your administration machine with the ‘Download CSR’ button (see Figure 5.10). 2. Send the saved CSR to a CA for certification. You will get the new certificate from the CA after a more or less complicated traditional authentication process (depending on the CA). 3. Upload the certificate to PS/2 KVM over IP switch using the ‘Upload’ panel as shown in Figure 5.10.
Single port PS2 KVM over IP The city where the organization is located. . State/Province The state or province where the organization is located. . Country The country where the organization is located. This is the two-letter ISO code, e.g. DE for Germany or US for the USA. . Challenge Password Some certification authorities require a challenge password to authorize later changes on the certificate (e.g. revocation of the certificate). The minimal length of this password is 4 characters. .
Single port PS2 KVM over IP on the Host interface setting, not all of the following options are always visible. Warning: To get USB remote keyboard access during the boot process of the host, the following conditions must be fulfilled: – the host’s bios must have USB keyboard support – the USB cable must be connected – “USB” or “Auto” must be selected in the Host interface option . USB Mouse Type Selecting “MS Windows 2000 or newer” enables the “absolute” mouse mode.
Single port PS2 KVM over IP Video quality and speed Using this option it is possible to tune the video system of PS/2 KVM over IP switch to either maximize picture quality or speed. When set to "best quality" the picture looks clean but the video update speed won’t be as fast as possible. If responsiveness is more important to you than achieving the best quality, set the option to ’high speed’. In this mode, artifacts will appear.
Single port PS2 KVM over IP Linux for terminating the X-Server. The syntax to define a new Button Key is as follows: [confirm] < keycode > [+| - [_] < keycode >]_ confirm requests confirmation by a dialog box before the key strokes will be sent. keycode is the key to be sent. Multiple key codes can be concatenated with a + or a - sign. The + sign builds key combinations, all keys will be pressed until a - sign or the end of the combination is encountered.
Single port PS2 KVM over IP Figure 5.12: PS/2 KVM over IP switch network settings . IP auto configuration With this option you can control if PS/2 KVM over IP switch should fetch its network settings from a DHCP or BOOTP server. For DHCP you have to enter dhcp and for BOOTP supply bootp accordingly. If you specify none then IP autoconfiguration is disabled. . IP address IP address in the usual dot notation. . Subnet mask The net mask of the local network. .
Single port PS2 KVM over IP Port number at which PS/2 KVM over IP switch’s Remote Console server and HTTPS server are listening. If left empty the default value will be used. . HTTP port Port number at which PS/2 KVM over IP switch’s HTTP server is listening. If left empty the default value will be used. . Telnet port Port number at which PS/2 KVM over IP switch’s Telnet server is listening. If left empty the default value will be used. .
Single port PS2 KVM over IP Figure 5.14: Dynamic DNS configuration panel You have to perform the following steps in order to enable Dynamic DNS: 1. Make sure the LAN interface of PS/2 KVM over IP switch is properly configured. 2. Enter the Dynamic DNS Settings configuration dialog as shown in Figure 5.14 (Menu → Network Settings → Dynamic DNS Settings) 3. Enable Dynamic DNS and change the settings according to your needs (see below). . Enable Dynamic DNS This enables the Dynamic DNS service.
Single port PS2 KVM over IP 5.6 Serial Settings The PS/2 KVM over IP switch Serial Settings (Figure 5.15 on the following page) allow you to specify, what device is connected to the serial port and how to use it. Figure 5.15: Serial Settings Configuration login Don’t use the serial port for any special function; use it only for the initial configuration (see Section 4.1). Modem Allows to access PS/2 KVM over IP switch via modem, see Section 5.6.1 for details.
Single port PS2 KVM over IP This is an optionally available external module to switch power of a single system by putting it in the power supply line of the controlled system. 5.6.1 Modem Settings PS/2 KVM over IP switch offers remote access using a telephone line in addition to the standard access over the built-in Ethernet adapter. The modem needs to be connected to PS/2 KVM over IP switch’s serial interface.
Single port PS2 KVM over IP and use the Remote Console. Even his user name and password can only be changed by the ’super’ account. Upon delivery, both accounts have the password ’pass’. Make sure to change these passwords immediately after you have installed and firstly accessed your PS/2 KVM over IP switch. While the ’user’ account never sees the following options, the ’super’ account can change the name and password for both accounts. Figure 5.16 shows the User Settings Panel panel of the front-end.
Single port PS2 KVM over IP 5.8 Maintenance Figure 5.17: Maintenance 5.8.1 PS/2 KVM over IP switch Board Summary This section contains a summary with various information about this PS/2 KVM over IP switch and its current firmware and allows you to reset the device. Have a look at Figure 5.17 for an example. 5.8.2 Maintenance features 5.8.2.
Single port PS2 KVM over IP Figure 5.18: Event Log Important events like a login failure or a firmware update are logged to a choice of logging destinations (see Figure 5.18). Each of those events belong to an event group which can be activated separately. For a detailed specification of the existing event groups and the log events belonging to them, use the ’help’ link in the HTML frontend. The following section describes the different logging destinations and their use. 5.8.2.1.
Single port PS2 KVM over IP Figure 5.19: Event Log Settings . Internal Log The common way to log events is to use the internal log list of PS/2 KVM over IP switch. To show the log list, click on ’Event Log’ on the ’Maintenance’ page and then use the ’Prev’ and ’Next’ button to browse through the events. In the Event Log Settings you can choose how many log entries are shown on each page. Furthermore you can clear the log file here.
Single port PS2 KVM over IP Email address text field in the Event Log Settings. These mails contain the same description strings as the internal log file and the mail subject is filled with the event group of the occurred log event. In order to use this log destination you must specify a SMTP server, that has to be reachable from the PS/2 KVM over IP switch device and that needs no authentication at all (:). .
Single port PS2 KVM over IP to an event group which can be activated or deactivated separately for each destination. This is done with a checkbox table, where each row is representing an event group and a column stands for one logging destination. Press the Apply button to activate your changes. 5.8.2.2 Date/Time Setting Figure 5.21: Date/Time settings This link refers to a page, where the internal realtime clock of PS/2 KVM over IP switch can be set up (see Figure 5.21).
Single port PS2 KVM over IP Before you can start updating the firmware of your PS/2 KVM over IP switch the new uncompressed firmware file must be accessible on the system that you use for connecting to PS/2 KVM over IP switch. Updating the firmware is a three-stage process: Firstly the new firmware file is uploaded onto PS/2 KVM over IP switch. In order to do that you need to select the file on your local system using the browse button of the Upload Firmware panel (see Figure 5.22).
Single port PS2 KVM over IP Attention: The three-stage firmware update process and complete consistency check are making a mistake in updating the firmware almost impossible. However, only experienced staff members or administrators should perform a firmware update. Make sure PS/2 KVM over IP switch’s power supply won’t be interrupted! 5.8.3 Reset Functions This section allows to reset specific parts of the device. Currently this involves the keyboard/mouse emulation and the video engine.
Single port PS2 KVM over IP Shows a compound string o_ all available version numbers . terminal Starts the terminal passthrough mode for serial port . The key sequence ‘ exit’ switches back to command modus. 6. Troubleshooting Q 001: The remote mouse doesn’t work or is not synchronous A 001: Make sure the mouse settings in PS/2 KVM OVER IP match the mouse model. There are some circumstances where the mouse synchronization process could behave incorrectly, refer to Section 5.3.
Single port PS2 KVM over IP to install the certificate. Q 010: Can’t upload the signed certificate in MacOS X A 010: If an ’internal error’ occurs while uploading the signed certificate either change the extension of the file to .txt or add a file helper using the Internet Explorer preferences for this type of file. Make sure that the encoding is plain text and the checkbox ’use for outgoing’ is checked. Another possibility is to use a Mozilla based browser.
Single port PS2 KVM over IP A. Pin Assignments A.1 VGA HD-15 A.
Single port PS2 KVM over IP A.3 RJ 45 Connector ISDN A.4 Serial SUB-D 9 Connector 1 A.
Single port PS2 KVM over IP B Key Codes Table C.1 shows the key codes used to defines key strokes or hotkeys for several functions. Please note that these key codes do not represent necessarily key characters that are used on international keyboards. They name a key on a standard 104 key PC keyboard with an US English language mapping. The layout for this keyboard is shown in Figure C.1.
Single port PS2 KVM over IP F1 F2 F3 F4 F5 F6 F7 F8 F9 F10 F11 F12 PRINTSCREEN SCROLL LOCK BREAK INSERT HOME PAGE UP DELETE END PAGE DOWN UP LEFT DOWN RIGHT NUM LOCK NUMPAD0 NUMPAD1 NUMPAD2 NUMPAD3 NUMPAD4 NUMPAD5 NUMPAD6 NUMPAD7 NUMPAD8 NUMPAD9 NUMPADPLUS,NUMPAD PLUS NUMPAD/ NUMPADMUL,NUMPAD MUL NUMPADMINUS,NUMPAD MINUS NUMPADENTER WINDOWS MENU Table C.