
User guide


4 Integrated LCD KVM Switch Installer/User Guide
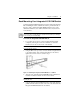
5. Using the flat screws provided, attach both the left and right
brackets to the Integrated LCD KVM Switch to secure the unit.
Figure 1.3: Utilizing the Rail Lock Switch
NOTE: To attach the long support brackets (for cabinet mounts more than 33
inches long), you must remove the factory installed rear brackets and replace with
the long brackets provided. Adjust the long brackets to fit the cabinet and use two
of the previously removed screws to tighten. Repeat steps 1-5 of the mounting
procedure to secure the unit.
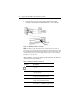
After installation, reference the following table which lists the functions
of the LCD monitor push-buttons.
Table 1.1: Monitor Push-button Functions
Controls Description
Soft turn your Integrated LCD KVM Switch
on or off.
Auto Auto-synchronizes and scales down display
to factory presets.
Up Allows you to scroll up to a function and
change values within that function.
Down Allows you to scroll down to a function and
change values within that function.
Menu Accesses the main menu and acts as the
Enter button. Press Menu to apply changes.
Rail Loc
k
Switch