EKP-IV Pro Quick Start Guide Updated to V2.01.86R Via Caboto, 9 54036 Marina di Carrara - MS - ITALIA E-mail: info@avmap.
Table of contents I. Introduction to the EKP-IV A. EKP-IV Parts List B. IMPORTANT: Warnings and Warranty C. Powering up your EKP-IV D. EKP-IV Buttons and Controls II. Setting up the EKP-IV A. System Setup 1. General Setup 2. Fix Setup 3. Alarm Setup 4. Track Setup 5. Units Setup 6. Date & Time Setup B. Moving Map Setup 1. Auto Position Mode 2. Map Orientation 3. Range Rings 4. The Data Window 5. VFR Settings 6. Airspace Settings 7. Land Settings 8. Other Settings C. Selective Display D.
. d) e) f) a) b) c) d) e) f) g) h) i) Activating a Flight Plan Selecting an Approach Deactivating a Flight Plan Managing Flight Plans from the Flight Plan Database Window Creating a Flight Plan Removing Waypoints Inserting Waypoints Activating a Flight Plan Selecting an Approach Deactivating a Flight Plan Renaming a Flight Plan Reversing a Flight Plan Clearing a Flight Plan IV. Advanced Functions of the EKP-IV A. File Manager B. Serial Port Data Transfer 1. Download or Upload Waypoints 2.
I. Introduction to the EKP-IV If you have never used your EKP-IV before, it is strongly recommended that you read the entire User Manual before proceeding. This document is intended as a supplement to the User Manual, highlighting some of the more commonly used features and menus of the EKP-IV. It is no way designed to replace the User Manual and will not touch upon all of the items in the User Manual. A.
Insurance is recommended. LIMITATION OF IMPLIED WARRANTIES - Except as set forth above, all other expressed or implied warranties, including those of fitness for any particular purpose and merchantability, are hereby disclaimed. Some states do not allow limitations on warranties, so the above limitation may not apply to you. EXCLUSIONS - This warranty does not cover the following: • Installation • Finishes • Defects resulting from installation.
D. EKP-IV Buttons and Controls Power – Used to turn EKP-IV On/Off. Also used to adjust brightness and contrast. Page – Lists nearest airports, VOR’s, NDB’s, etc GOTO – Used for navigating to specified objects (airports, waypoints, addresses) Zoom Out – Zooms map out Toggle – Moves the cursor around the screen and changes selections in menus Zoom In – Zooms map in Menu – Brings up the Moving Map Menu.
II. Setting up the EKP-IV There are lots of ways to customize the display on your EKP-IV. This section will review how to configure the basic system settings as well as the settings on the Moving Map. A. System Setup M EN U M EN U The EKP-IV contains a highly detailed system of configurable options that allow the pilot to customize the unit to his preference. The EKP-IV User Manual should be consulted for full Menu setups and configurations, but a few of the important ones will be covered here below.
• Language – Sets the Language displayed in the Menus. Map detail is always in English. Default is ENGLISH. 2. Fix Setup The Fix Setup sub-menu contains the settings relative to GPS data input and display: • Fix Symbol – The flashing icon on the Moving Map indicating the current position fix. Options are PLANE or STANDARD (a circle with an X icon). Default is PLANE. • Course Predictor – The EKP-IV can display a line with a circle at the end to indicate the position the aircraft will reach at the set time.
4. Track Setup 5. Units Setup The Track Setup sub-menu contains the settings relative to the Track, or course traveled, which can be recorded by the EKP-IV. • Track Display – Specifies whether the Track is displayed or not displayed on the Moving Map. Default is OFF. • Track Recording Step – A Track is made by connecting dots dropped at intervals along a traveled course. The Track Recording Step defines the interval based on Distance, Time (5 SEC, 30 SEC, 1 MIN) or Auto.
• Distance – Statute Miles (SM), Nautical Miles (NM), Kilometers (KM) • Speed – Miles per Hour (MPH), Knots (KTS) or Kilometers per Hour (KPH) • Altitude – Feet (FT), Meters (MT) or Flight Levels (FL) • Depth – Feet (FT), Fathoms (FM) or Meters (FT) • Fuel – Gallons (GAL), Liters (LIT), Kilograms (KG), Pounds (LB) or British Gallons (BGAL) • Vertical Speed – Feet per Minute (FT/MIN), Meters per Second (M/S) or Degrees (DEG) • Temperature – Fahrenheit (F) or Celsius (C) • North Reference – Magnetic or True •
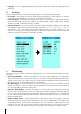
B. Moving Map Setup This section will review the settings for the Moving Map and cartographic display. 1. Auto Position Mode The EKP-IV has 3 different modes that it can operate in while on the Moving Map: • Auto Home – In this mode, you are able to pan away from the current position fix to view other parts of the map. If there is no button or toggle movement for one minute, the cursor will automatically return to the position fix.
position allowing 75% of the map to be ahead of the plane. The default setting for Map Orientation is Track Up. To change it, press MENU from the Moving Map and select MAP ORIENTATION. 3. Range Rings Range Rings OFF 4. The Data Window EN TE R M EN U In Track-up or North-up Mode, a 30 degree radial projected over the entire Moving Map from the current position is available. The Range Ring, as it is called, is provided to increase pilot awareness.
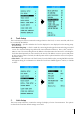
• 2 Lines – Displays six Data Fields. • 3 Lines – Displays nine Data Fields • HSI + Fields – Displays the HSI along with six data fields. EN TE R M EN U There is also a fifth setting that lets you turn off the Data Window. Any of these settings can be selected from the Moving Map by pressing MENU and then selecting DATA WINDOW MODE. Additionally, the Data Window can be customized from over 20 available Data Fields.
5. EN TE R EN TE R M EN U EN TE R light blue. Move the highlight to the desired Data Field box to change and press ENTER to bring up the list of available Data Fields (see above). Select the new Data Field and press ENTER to set it. VFR Settings The VFR Settings control the display of aviation features found in the Jeppesen® database on the Compact Flash card: • Airports – ON/OFF. The default setting is ON. • VOR – ON/OFF. The default setting is ON. • NDB – ON/OFF. The default setting is ON.
M EN U All of the above categories can be set from the Moving Map Menu by pressing MENU on the Moving Map and selecting VFR SETTINGS. 6. Airspace Settings The Airspace Settings control the display of Airspace data found in the Jeppesen Database on the Compact Flash Card. • Low Airways – ON/OFF. The default setting is OFF. Please note that when Low Airways is turned on, elevation data will be turned off under the 50 nm zoom. • Controlled Areas – ON/OFF. The default setting is ON.
• Landmarks – ON/OFF. The default setting is OFF. M EN U All of the above categories can be set from the Moving Map Menu by pressing MENU on the Moving Map and selecting LAND SETTINGS. 8. Other Settings The Other Settings control a few general and basic options of the Moving Map. • User Points – OFF/ICON/ICON LABEL. The default setting is ICON/LABEL. • Objects Overlap – ON/OFF. The default setting is ON.
M EN U image above, the first 3 columns are assigned to CYCLE. The number in the column designates the number of times CYCLE must be pressed. D. Points of Interest (POI) Settings M EN U Points of Interest (POI) are also displayed in the EKP-IV and they are handled in much the same way as Selective Display. This is an important customization as many metropolitan areas can have an overwhelming number of POI and not all of them are necessary for situational awareness.
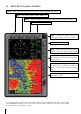
E. Terrain and TAWS 1. Terrain Depiction The EKP-IV contains a detailed topographic map on the CF card that helps provide improved situational awareness. Additionally, the EKP-IV now features a Terrain Awareness Warning System (TAWS) that further highlights safe and unsafe elevation for an easier to read map display. The EKP-IV has a shaded elevation map, called Terrain Depiction that enables pilots to visualize the approximate elevation at any location on the screen.
at the top or bottom of the Moving Map, depending on the cursor location. In the image above, the cursor is in the Rockies and the approximate elevation is reported to be 9,252 feet. The shading will only be visible with Terrain On. 2. TAWS (Terrain Awareness Warning System) TAWS is a very powerful feature that uses the separation between the aircraft and the land elevation to highlight the dangerous land elevations, allowing the map to be more easily and readily interpreted. As seen in Section E.
Color Transparent = Green= Yellow = Red = Lowland (LOW SEP) OCH > 2000 ft 1000 ft < OCH > 2000 ft 500 ft < OCH > 1000 ft 0 ft < OCH > 500 ft Highland (HIGH SEP) OCH > 3000 ft 2000 ft < OCH > 3000 ft 1000 ft < OCH > 2000 ft 0 ft < OCH > 1000 ft In simplest terms the TAWS works just like a traffic light on the road.
M EN U M EN U To get to the Calculator page, press MENU twice from the Moving Map and select CALCULATOR. 1. Countdown Timer The Countdown Timer will sound an alarm at the end of a set time interval. Once activated, the timer will continue in the background of the software, even if the Calculator page is closed, or if the timer data is not displayed in the Data Window. This function requires a GPS fix as the calculation of time is based on the GPS data. 2.
III. Flying with the EKP-IV This section will review creation of Waypoints and Flight Plans, the primary uses of the buttons on the EKP-IV and all other related functions. A. The GOTO Button The GOTO button on the EKP-IV is primarily used to create a temporary Flight Plan that is not stored in the memory of the unit. It can be used to find any of the Aeronautical Database categories, such as Airports, VOR’s, NDB’s and Intersections.
From this list, you can use the following buttons: MENU - Changes the search category (User Waypoint, Airport, VOR, NDB, INT, ARTCC Freq, FSS Freq or POI) ENTER - Brings up the database information of the highlighted item GOTO - Once to set the highlighted object as a destination, or hold it down to bring up that object on the Moving Map. E G PA Holding down the PAGE button for one second will bring up the NavData page. This page displays all available 24 Data Fields in one page.
C. The CLEAR Button The primary function of the CLEAR button is to cancel out of Menus. On the Moving Map it has two functions – to remove the quick info windows (Elevation, Lat/Lon, Street Names, Airport info, etc) that appear and to bring the cursor to the position fix. It is important not to press CLEAR too many times as it could cause the screen to jump around a lot. If the cursor is off of the position fix and no quick info has appeared, pressing CLEAR once will bring you the position fix.
• To edit existing procedures, highlight it and press and hold ENTER. • To check or uncheck a procedure, highlight it and press ENTER. • To insert a procedure, highlight the line below the insertion spot and press ZOOM IN. • To delete a procedure, highlight it and press ZOOM OUT. • To append a procedure to the end of the Checklist, press GOTO. E. Waypoints The EKP-IV has the capacity to store 1,000 waypoints.
EN TE R EN TE R 3. Moving Waypoints EN TE R Waypoints can be moved easily in the EKP-IV. Put the cursor on the Waypoint to move, press ENTER, select MOVE WAYPOINT from the menu and a silver band will emerge from the waypoint, following the cursor as you find a new location. Press ENTER to finalize the move and save the Waypoint’s new position. F. Flight Plans The EKP-IV has the capacity for 10 Flight Plans with a maximum of 100 legs in each.
2. Managing Flight Plans from the Moving Map Window a) Creating a Flight Plan EN TE R EN TE R To add a Flight Plan (FP) Leg from the Moving Map, simply move the cursor to the desired destination point, press ENTER and select ADD FP LEG. This can be done once for a direct route, or multiple times to build a Flight Plan of many waypoints. EN TE R EN TE R As additional waypoints are added, a black line will connect them; this is called the Flight Plan (FP) Leg.
pressing MENU twice, then selecting FLIGHT PLAN. b) Removing Waypoints c) Inserting Waypoints EN TE R Waypoints can be removed from the Moving Map by placing the cursor over the Waypoint to delete pressing ENTER and selecting REMOVE FP LEG. EN TE R EN TE R Inserting Waypoints through the Flight Plan window was covered in section E.2 above. To insert waypoints through the Moving Map, simply place the cursor over the FP Leg of the viewed (active) Flight Plan and press ENTER and select INSERT FP LEG.
O G TO Once the Flight Plan is active, the EKP-IV will navigate along the bearing of each FP Leg. The active FP leg will be shaded in a black and purple striped line, while the inactive FP Legs will be black. Current GPS Fix Active FP Leg Inactive FP Legs e) Selecting an Approach O G TO EN TE R If an airport is the active destination in the GOTO Flight Plan, then pressing GOTO again will bring up the option for selecting the approach regardless of the cursor position on the screen.
f) Deactivating a Flight Plan From the Moving Map Screen press GOTO and select DEACTIVATE FP. O G TO 3. Managing Flight Plans from the Flight Plan Database Window a) Creating a Flight Plan If you have known airports or intersections or waypoints that are more spread out, it may be easier to create the Flight Plan from the Flight Plan database window (follow the steps above to get to the Flight Plan window).
EN TE R CL EA R M EN U OR b) Removing Waypoints c) Inserting Waypoints M O UT ZO O EN TE R To remove a Waypoint from the Flight Plan database window, highlight the waypoint to remove, press ZOOM OUT and press ENTER to confirm. Follow the steps under Section 3.a above for ‘Creating a Flight Plan’ to insert Waypoints into a Flight Plan, the procedure is the same d) Activating a Flight Plan M EN U M EN U M EN U From the Flight Plan Database window, press MENU and select ACTIVATE FP.
Current GPS Fix Active FP Leg Inactive FP Legs e) Selecting an Approach M EN U EN TE R The EKP-IV allows the pilot to pre-select an approach at the end (destination) of the Flight Plan and to change the approach as desired. The approach can only be set through the Flight Plan window. The EKP-IV does not allow setting of an approach from the Moving Map while navigating or planning. The approach can, however, be established on an airport that is part of a direct GOTO.
M EN U EN TE R press MENU and select RENAME FP from the sub-menu that appears. h) Reversing a Flight Plan EN TE R M EN U A Flight Plan can easily be reversed through the Flight Plan database window by pressing MENU and selecting REVERSE FP from the sub-menu that appears. i) Clearing a Flight Plan EN TE R M EN U Once the Flight Plan is no longer needed, it can be cleared from the EKP-IV memory.
IV. Advanced Functions of the EKP-IV This section will review backing up your User Data and transfer of data via a serial connection. A. File Manager M EN U M EN U The EKP-IV has a File Manager that makes it possible to save User Data (Waypoints, Flight Plans and Tracks) to the Compact Flash card. This is especially useful when switching CF cards for different software versions, or when updating the software or map data on the CF cards.
EN TE R EN TE R Z IN OO M Conversely, highlighting a file and pressing ZOOM OUT will delete the file from the CF card. To load a file from the CF card, highlight it and press ENTER. The data will then be uploaded into the EKP-IV. B. Serial Port Data Transfer The EKP-IV can also send and receive User Data from the AvMap Flight Planner, Jeppesen FlightStarTM or other compatible programs through the serial port.
M EN U M EN U 3. Download Track 36 M EN U M EN U The Track function allows you to send Track data through the serial port using the C-MAP Proprietary NMEA0183 $PCMPT sentence. To download the Track, press MENU twice from the Moving Map, select COMMUNICATIONS and then TRACK DOWNLOAD.
V. PRO FUNCTIONS The following features aer new for the EKP IV PRO. A. Functions for the automatic creation of Search and Rescue (S.A.R) flight pattern IIn order to enter the Menu: ‘MENU’ 1sec+ “FLIGHT PLAN” + ‘ENTER’ + ‘MENU’ You may choose among three patterns: EXPANDING SQUARE, CREEPING LINE AHEAD and CIRCULAR. Using the arrow keys, select the values for each field and press ‘ENTER’ to move to the next item.
VI. Troubleshooting the EKP-IV The following is a brief overview of some of the common questions regarding the operation of the EKP-IV. Should you ever have any problems, please go through these questions first, and if you require additional support please contact the AvMap Technical Support department at 800.363.2627. A. What does the red X on the Moving Map indicate? The large red X covering the entire Moving Map indicates that there is no GPS position fix.
of a maximum charge for an emergency. F. When I turn on my unit, the screen is blank and it constantly beeps? The constant beep is the EKP-IV’s way of telling you that something is wrong in the data on the CF card or in the internal memory of the EKP-IV. Usually, a RAM clear will cure this problem. To perform a RAM clear, make sure the unit is off, then press and hold ENTER while powering on the EKP-IV. This will bring you into the System Menu where you select RAM MENU and then RAM CLEAR.