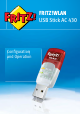
FRITZ!WLAN USB Stick AC 430 Configuration and Operation
Table of Contents Symbols and Highlighting . . . . . . . . . . . . . . . . . . . . . . . . 4 1 Safety Instructions . . . . . . . . . . . . . . . . . . . . . . . . . . . . . . 5 2 FRITZ!WLAN USB Stick AC 430 at a Glance . . . . . . . . . . . 6 2.1 2.2 2.3 Package Contents . . . . . . . . . . . . . . . . . . . . . . . . . . . . . . . . . . . . . . . . 6 Operation Requirements . . . . . . . . . . . . . . . . . . . . . . . . . . . . . . . . . . . 6 LEDs . . . . . . . . . . . . . . . . . . . . . . . . . . .
7 Help in Case of Errors . . . . . . . . . . . . . . . . . . . . . . . . . . . 26 7.1 7.2 7.3 7.4 7.5 Errors During Installation. . . . . . . . . . . . . . . . . . . . . . . . . . . . . . . . . . 26 WLAN Connection Is Not Established . . . . . . . . . . . . . . . . . . . . . . . . 27 Errors during Data Exchange with Other Devices in the Network . . 28 The Wireless LAN Connection is Faulty or Interrupted . . . . . . . . . . . 29 Setting Automatic IP Address Assignment in Windows. . . . . . . . . .
Symbols and Highlighting Symbols and emphasized text are used to mark certain information in this manual. Symbols This symbol marks useful hints and tips. This symbol indicates important instructions that must be observed to avoid malfunctions. Highlighting Highlighting Example Quotation marks designate elements in the user interface, path entries, and names of folders and files “Home Network” “C:\Pictures” “Info” Blue, underlined text designates addresses to be entered in the browser avm.
1 Safety Instructions When working with the FRITZ!WLAN USB Stick, follow the instructions below to protect yourself and the FRITZ!WLAN USB Stick from damage. • Do not install the FRITZ!WLAN USB Stick during an electrical storm. • Unplug the FRITZ!WLAN USB Stick from the computer during an electrical storm. • Never let liquids get inside the FRITZ!WLAN USB Stick. Otherwise, electric shocks or short circuits may result. • Protect the FRITZ!WLAN USB Stick from dust, moisture and steam.
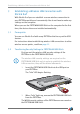
FRITZ!WLAN USB Stick AC 430 at a Glance 2 FRITZ!WLAN USB Stick AC 430 at a Glance The FRITZ!WLAN USB Stick connects your computer with a FRITZ!Box or another wireless access point via wireless LAN. The wireless connection provides the computer with access to the Internet. The FRITZ!WLAN USB Stick can also connect your computer directly with other computers, without a wireless access point. Then the computers can exchange data in what is called an ad hoc network. 2.1 Package Contents • • • 2.
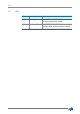
LEDs 2.3 LEDs LED Condition Meaning USB glows green The FRITZ!WLAN USB Stick was detected by the operating system. WLAN flashes yellow The FRITZ!WLAN USB Stick is exchanging data with another wireless device.
Establishing a Wireless LAN Connection with Stick & Surf 3 Establishing a Wireless LAN Connection with Stick & Surf With Stick & Surf you can establish a secure wireless connection to your FRITZ!Box quickly and conveniently. You do not have to make any settings on the computer. When you use the FRITZ!WLAN USB Stick on the computer for the first time, the device drivers are installed automatically. 3.1 Prerequisite You can use Stick & Surf with every FRITZ!Box that has a port for USB devices.
Connecting FRITZ!WLAN USB Stick to the Computer 3.3 Connecting FRITZ!WLAN USB Stick to the Computer Once the wireless LAN security settings have been transmitted to the FRITZ!WLAN USB Stick, connect it to your computer. 1. Start your computer. 2. Insert the FRITZ!WLAN USB Stick into a USB port on the computer. 3. Windows detects the FRITZ!WLAN USB Stick automatically. When you insert the FRITZ!WLAN USB Stick in your computer for the first time, the device drive installation starts automatically.
Connecting FRITZ!WLAN USB Stick to the Computer 6. After the device driver is installed, a wireless LAN connection between the computer and FRITZ!Box is established automatically. The Stick & Surf logo appears on the screen. The wireless LAN connection has been established successfully when the FRITZ!WLAN icon in the Windows taskbar turns green. Every time the computer is started the connection is resumed automatically. For more information on the FRITZ!WLAN software, see page 24.
Establishing a Wireless LAN Connection Manually or with WPS 4 Establishing a Wireless LAN Connection Manually or with WPS This chapter describes how to install the FRITZ!WLAN USB Stick on the computer and establish a wireless LAN connection to any wireless access point, also known as a wireless router. You can establish the wireless LAN connection automatically with WPS, or manually on the computer. It is simpler to establish wireless connections to a FRITZ!Box using Stick & Surf, see page 8. 4.
Establishing a Wireless LAN Connection 3. In the “AutoPlay” window, click “FRITZ!WLAN USB Stick AC 430 Installation”. This window does not always appear. In some versions of Windows the device driver installation is performed automatically without requiring any user intervention. 4. Confirm any questions asked during installation by clicking “Yes”, “Install” or “Continue”, for instance, the security prompt by Windows’ user account control.
Establishing a Wireless LAN Connection 4. Click “OK”. The input field for the network key appears. If the wireless access point (router) supports WPS, the following message will also appear: “You can also connect by pushing the button on the router”. 5. Enter the network key of the wireless access point and click “OK”. On a FRITZ!Box the preconfigured network key is located on the base of the device. or If the wireless access point supports WPS, press the button on the access point that enables WPS.
Establishing a Wireless LAN Connection Establishing a Wireless LAN Connection in Windows 7 / Windows Vista 1. Click the WLAN icon bar. or in the Windows task A list appears on the screen, showing all wireless networks found in the vicinity of the FRITZ!WLAN USB Stick. 2. Select a wireless access point. 3. Click “OK”. The input field for the network key appears.
Establishing a Wireless LAN Connection 4. Enter the network key of the wireless access point and click “OK”. On a FRITZ!Box the preconfigured network key is located on the base of the device. or If the wireless access point supports WPS, press the button on the access point that enables WPS. The network key is transferred to the computer automatically. On a FRITZ!Box without a “WPS” button, press the “WLAN” button until the “WLAN” LED starts flashing. The WLAN connection will be established.
Establishing a Wireless LAN Connection 3. Enter the network key of the wireless LAN access point twice and then click “OK”. The wireless LAN connection is established and resumed automatically every time the computer is started. On a FRITZ!Box the preconfigured network key is located on the base of the device.
Connecting Computers Directly (Ad Hoc Network) 5 Connecting Computers Directly (Ad Hoc Network) In a direct connection (also called an ad hoc network), computers are connected with each other without any wireless access point like the FRITZ!Box involved. If you set up an ad-hoc network on a computer with the FRITZ!WLAN USB stick, other computers can register with the ad hoc network. The Windows 8.1 and Windows 8 operating systems no longer allow an ad hoc network to be established. 5.
Setting Up an Ad Hoc Network in Windows Vista 7. Select a WLAN encryption method (“Security type”). WPA and WPA2 offer the highest level of security. For more information on the various wireless LAN encryption methods, click the “Need help deciding” link next to the “Security Type” drop-down list. 8. Enter a “Security key”. 9. The ad hoc network is deleted automatically as soon as all participants clear the connection or the provider of the ad hoc network clears all connections.
Setting Up an Ad Hoc Network in Windows XP 5.3 4. Select “Set Up a Wireless Ad-hoc Network (Computer-toComputer)” and click “Next”. 5. Follow the wizard’s instructions. The wizard takes you step by step through the configuration of the ad hoc network. Setting Up an Ad Hoc Network in Windows XP 1. Click the “Start” button and select “My Network Places”. If “My Network Places” is not available, open “My Computer” and click “My Network Places” under “Other Places”. 2.
Setting Up an Ad Hoc Network in Windows XP 3. In the “Network Connections” window, click the “Wireless Network Connection / FRITZ!WLAN USB Stick” icon with the right mouse button. Select “Properties” from the context menu. 4. In the “Wireless Network Connection Properties” window, switch to the “Wireless Networks” tab. 5. Click the “Add...” button. 6.
Setting Up an Ad Hoc Network in Windows XP 7. Click the “OK” button. Assigning IP Addresses to Participating Devices Windows XP does not provide a DHCP server that can assign dynamic IP addresses to the participants of the ad-hoc network. This means you have to assign fixed IP addresses to the participating devices. 1. Open the properties of the network connection “Wireless Network Connection / FRITZ!WLAN USB Stick” (see steps 1—3 in “Setting Up a New Ad Hoc Network”). 2.
Setting Up an Ad Hoc Network in Windows XP 5. On the computer that provides the ad hoc network you can assign, for instance, the IP address 192.168.1.1 and the subnet mask 255.255.255.0. Assign to other computers participating in the ad hoc network IP addresses between 192.168.1.2 and 192.168.1.9. Each IP address can be assigned only once.
Setting Up an Ad Hoc Network in Windows XP Registering with an Ad hoc Network The computer on which you set up the ad hoc network still has to log in to the ad hoc network. Only then is the ad hoc network visible for other computers. 1. Click the WLAN icon Windows task bar. in the notification area of the 2. Select the ad hoc network and click “Connect”. Now you can use the WLAN software on the other computers to search for and log in to the ad hoc network.
The FRITZ!WLAN 6 The FRITZ!WLAN The FRITZ!WLAN software is installed on your computer along with the FRITZ!WLAN USB Stick. FRITZ!WLAN offers you information on the wireless LAN connection and various settings for the FRITZ!WLAN USB Stick. The software is not required to establish wireless LAN connections. 6.1 Starting FRITZ!WLAN Double-click the FRITZ!WLAN icon bar. in the Windows task FRITZ!WLAN starts. The “Connection Monitor” tab is active. 6.
Online Help The tabs present the following information and settings: Tab Information / Settings Connection Monitor • information on the quality of the wireless LAN connection • a wireless LAN test to test and improve the wireless LAN connection Connection Details Properties 6.3 various data on the wireless LAN connection and the wireless LAN devices involved, e.g.
Help in Case of Errors 7 Help in Case of Errors This chapter presents assistance for problems that arise during installation, while establishing the wireless LAN connection, or during data exchange with other devices in the network. 7.1 Errors During Installation No FRITZ!WLAN Icon in the Windows Task Bar The FRITZ!WLAN icon is not displayed in the Windows task bar. Cause The FRITZ!WLAN USB Stick was not installed correctly or is disabled in the Windows “Device Manager”.
WLAN Connection Is Not Established The Computer Does Not Detect FRITZ!WLAN USB Stick The computer does not automatically detect the FRITZ!WLAN USB Stick when it is inserted. The device driver installation does not start. Cause The FRITZ!WLAN USB Stick is not inserted correctly into the USB port or the chip set drivers of the computer are out of date. Help Remove the FRITZ!WLAN USB Stick from your computer and then insert it again into a USB port of the computer. Install the latest chip set drivers.
Errors during Data Exchange with Other Devices in the Network Switching On and Correctly Positioning the Wireless Access Point When you search for wireless networks in the vicinity of the FRITZ!WLAN USB Stick, Windows does not find your wireless access point. Cause The wireless access point is switched off or located too far away. Help Connect the wireless access point to electrical power and switch it on. Reduce the distance between the FRITZ!WLAN USB Stick and the wireless access point. 7.
The Wireless LAN Connection is Faulty or Interrupted Help Check to make sure that you entered the correct network key. The preconfigured network key is located on the underside of your FRITZ!Box. Enable automatic IP address assignment (DHCP) in Windows; see page 31. Checking the Ad Hoc Connection The FRITZ!WLAN USB Stick is connected directly to another wireless adapter via wireless radio, but the two adapters cannot exchange data. Cause The network settings are incorrect.
The Wireless LAN Connection is Faulty or Interrupted Positioning Wireless Devices Correctly The wireless LAN connection is faulty or interrupted. Cause There are obstacles between the wireless access point and FRITZ!WLAN USB Stick. Help Do not position your wireless devices in the corner of a room. Do not set up your wireless devices directly next to or beneath an obstacle (like a cabinet or radiator).
Setting Automatic IP Address Assignment in Windows 7.5 Setting Automatic IP Address Assignment in Windows Wireless access points like the FRITZ!Box are equipped with a DHCP server. The DHCP server assigns addresses for the connected computers. For your computer to obtain its IP address from the DHCP server automatically, automatic assignment of IP addresses must be set in Windows. Preparations: Opening Network Connections Windows 8.1 and Windows 8 1.
Setting Automatic IP Address Assignment in Windows Enabling Automatic IP Address Assignment 1. In the “Network Connections” window, click your wireless network connection with the right mouse button. 2. Select “Properties”. 3. Under “This connection uses the following items”, select “Internet Protocol Version 4 (TCP/IPv4)”. In Windows XP select the “Internet Protocol (TCP/IP)”. 4. Click the “Properties” button. 5.
Removing the FRITZ!WLAN USB Stick 8 Removing the FRITZ!WLAN USB Stick During uninstallation the driver software of the FRITZ!WLAN USB Stick and the FRITZ!WLAN software are removed from your computer. 1. Click the “Start” button in Windows. 2. Click “Control Panel”. 3. Click “Programs” or “Software”. 4. Click “Uninstall a program” or “Change or Remove Programs”. 5. Select the “AVM FRITZ!WLAN” software. 6. Click “Uninstall/Change” or “Change/Remove”.
Wireless LAN Standards 9 Wireless LAN Standards Your FRITZ!WLAN USB Stick AC 430 supports the following wireless LAN standards: Standard Frequency Band Data Throughput (Gross) Data Throughput (Net) 802.11b 2.4 GHz 11 Mbit/s maximum 5 Mbit/s maximum 802.11g 2.4 GHz 54 Mbit/s maximum 25 Mbit/s maximum 802.11n 2.4 / 5 GHz 150 Mbit/s maximum 80 Mbit/s maximum 802.11a 5 GHz 54 Mbit/s maximum 25 Mbit/s maximum 802.
Technical Specifications 10 Technical Specifications LEDs USB port WLAN module Frequency band Encryption Antenna Operating systems supported Dimensions (W x D x H): Weight Power supply Maximum power consumption Transmitter power Receiver sensitivity 2 (connection / activity) compatible with USB 2.0 and higher support for radio networks in accordance with IEEE 802.11n, IEEE 802.11g, IEEE 802.11b, IEEE 802.11a and IEEE 802.11ac 2.4 and 5 GHz WPA (Wi-Fi Protected Access) / WPA2 (802.
Customer Service 11 Customer Service 11.1 Documentation Help on the FRITZ!WLAN Software In the FRITZ!WLAN software you can open comprehensive Help by clicking the “Help” button or entering the “F1” key. Manual The printed quick guide to the FRITZ!WLAN USB Stick AC 430 is enclosed. The PDF file of the manual can be opened and downloaded from the Internet at the following address: avm.de/en/service/manuals Choose the “FRITZ!WLAN” product group and then “FRITZ!WLAN USB Stick AC 430”. The PDF is opened.
Updates 11.3 Updates FRITZ!WLAN USB Stick provides updates for the AVM in the Internet free of charge. The latest driver software can be downloaded at the following address: avm.de/en/Download 11.4 Support from the Support Team Support by E-mail You can send us an English-language request by e-mail at any time using the “Service” area at our web site. avm.
Support from the Support Team • What is the exact name of the wireless LAN access point you use with your FRITZ!WLAN USB Stick? The exact name of a FRITZ!Box is located on the underside of the box housing. • Which driver version of the FRITZ!WLAN USB Stick is installed? The driver version is listed in the FRITZ!WLAN program: Click the FRITZ!WLAN program icon in the notification area of the task bar and select the menu command “About”.
Manufacturer’s Warranty 11.5 Manufacturer’s Warranty We offer a manufacturer’s warranty of 5 years on the hardware of this original product. The warranty period begins with the purchase date from the first end user. Compliance with the warranty period can be proven by submission of the original invoice or comparable documents. This warranty does not restrict your warranty rights based on the contract of sale or other statutory rights.
Legal Notice Legal Notice This documentation and the software it describes are protected by copyright. AVM grants the nonexclusive right to use the software, which is supplied exclusively in object code format. The licensee may create only one copy of the software, which may be used exclusively for backup use. AVM reserves all rights that are not expressly granted to the licensee.
Declaration of CE Conformity The manufacturer AVM GmbH Alt-Moabit 95 D 10559 Berlin Germany herewith declares that the product FRITZ!WLAN USB Stick AC 430 Type WLAN-Controller complies with the following directives: 1999/5/EC R&TTE Directive: Radio Equipment and Telecommunications Terminal Equipment 2009/125/EC EU directive: ecodesign requirements for energy-related products 2011/65/EU EU directive: on the restriction of the use of certain hazardous substances in electrical and electronic equipment The foll
Disposal Information In accordance with European regulations and the Waste Electrical and Electronic Equipment Directive (WEEE), the FRITZ!WLAN USB Stick AC 430, as well as all devices and electronic components contained in the package, may not be disposed with household waste. In accordance with European regulations, the FRITZ!WLAN USB Stick AC 430, as well as all devices and electronic components contained in the package, may not be disposed with household waste.
Index A M ad hoc network . . . . . . . . . . . . . . . . . . . 17 manufacturer’s warranty. . . . . . . . . . . . 39 C N connecting with Stick & Surf . . . . . . . . . . . . . . . . 8 copyright . . . . . . . . . . . . . . . . . . . . . . . . 40 customer service . . . . . . . . . . . . . . . . . . 36 network error during data exchange . . . . . . 28 R recycling electrical equipment . . . . . . . . . . . 42 electronic equipment . . . . . . . . . . . 42 removing . . . . . . . . . . . . . . . . . . . . .
Index W warranty. . . . . . . . . . . . . . . . . . . . . . . . . 39 wireless LAN connection ad hoc network . . . . . . . . . . . . . . . . 17 transmission rate . . . . . . . . . . . . . . 24 with Stick & Surf . . . . . . . . . . . . . . . . 8 with WPS . . . . . . . . . . . . . . . . . . . . . 11 wireless networks service in Windows 7/Vista . . . . . . . . . . . . 14 in Windows 8.1 and 8. . . . . . . . . . . 12 in Windows XP . . . . . . . . . . . . . . . . 15 WLAN help for errors . . . . . . . . . . . . .