
Operation Manual


26
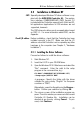
3 Driver Software Installation – Windows 3.x
Alternatively, click the Browse button to search for
the path in the directory list.
3. Click OK to start the installation program.
The ”Initialize Setup” message is displayed. Once
initialization is complete, the installation program’s
sign-on message appears. Click the Continue
button.
The installation can be canceled at any time by
selecting Exit.
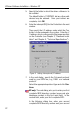
4. In the next dialog, enter the name of the directory in
which the ISDN-Controller software is to be installed.
The default is C:\IDRIVER; accept this suggestion or
enter any other directory name. Once your entry is
complete, confirm by clicking the Continue button.
5. Select the D-channel protocol used by your ISDN line
by clicking the desired option.
US only: The next dialog asks you to enter your first
complete ISDN directory number (area code plus
telephone number) in the first input field. In the
second field, enter your first complete SPID.
In the following dialog box, enter your second
complete ISDN directory number and your second
SPID. If you have been assigned only one directory
number and one SPID, leave the input fields in this
dialog blank and click the Continue button.
6. Now the installation routine copies the necessary
files to the specified drive and directory. When all
files have been copied, you will be prompted to
restart Windows.
The driver software installation for the Controller A1 in
Windows 3.x is now concluded.
The Controller’s driver software will be loaded automati-
cally whenever Windows 3.x is started. When Windows is
closed, the Controller will be deactivated.