
Operation Manual


17
3 Driver Software Installation – Windows 95/98
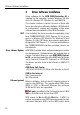
Figure 3 Settings for the ISDN-Controller A1
It is advisable to accept the value displayed here for
the I/O address and change the jumper position on
the Controller accordingly. To use a different I/O
address, start the Device Manager (“Settings / Control
Panel / System”) and enter the desired values before
restarting Windows.
8. The driver software now is copied to your computer.
A message appears announcing that the software
for the new hardware component has been installed.
Click Finish.
9. The next window indicates that the computer must
be shut down. The computer must be switched off
before physically installing the Controller so that all
settings performed can be activated.
10. Switch off your PC and all connected devices and
then pull the power plug.
3.1.2 Configuring the Controller
In the second step of installation, change the jumper
position on the AVM ISDN-Controller A1, if necessary.
Use the value displayed by the Add New Hardware
Wizard. Upon delivery the jumper is preset to the I/O
address 300 (see Chapter 2, “Hardware Installation” and
Chapter 4, “Technical Specifications“).
After installing the hardware components in Windows 95/
98 and setting the jumpers on the Controller A1 comes
the step of physically installing the Controller A1 in your
PC.