
Specifications

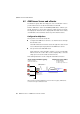


Step by Step: On the Employees’ Home Computers
56 AVM Access Server – 4 AVM Access Server Use Scenarios
Step by Step: On the Employees’ Home Computers
Steps A through F described below must be carried out on each em-
ployee’s home computer.
A Install NetWAYS/ISDN (Included in the AVM Access Server Package)
Install NetWAYS/ISDN according to the instructions in the Net-
WAYS/ISDN manual.
B Configure the Connection to the Internet Service Provider T-Online
1. In the “Settings” menu, select “Call destinations / New call desti-
nation...”. The NetWAYS/ISDN wizard starts, and assists you in
configuring an Internet connection.
2. In the “Type of Network” dialog, select the option “Internet”.
3. In the next dialog, select the option “Internet Providers with Reg-
istration”.
4. In the list of Internet Service Providers, select “T-Online ISDN”.
5. Confirm the suggested name for the Interent connection, “T-On-
line ISDN”.
6. Enter the authentication information for your T-Online Internet ac-
cess account.
7. Click “Next”, then “Finish” to complete the configuration.
An icon representing the Internet connection now appears in the
NetWAYS/ISDN window.
C Configure the AVM Access Server as a VPN Remote Network
1. Insert the floppy disk containing the export file created by the
AVM Access Server. In the NetWAYS/ISDN configuration, select
“VPN import” in the “File” menu. The Windows file selection dia-
log opens.
2. Select the file on the floppy disk with the file name extension .EFF,
and confirm your selection by clicking “Open”.
3. Enter the password you chose for the file on creating it in the AVM
Access Server.