
Specifications


Step by Step: On the Server in the Translation Agency Office
AVM Access Server – 4 AVM Access Server Use Scenarios 55
G Create Export Files with the Users’ Settings for NetWAYS/ISDN
The AVM Access Server allows you to save the user settings for indi-
vidual remote users in an export file. This file can then be imported in
NetWAYS/ISDN on the remote user’s home computer. The import op-
eration automatically configures the remote user’s connection to the
AVM Access Server. Carry out the following steps for each employee
individually.
1. In the object tree of the AVM Access Server’s Configuration View,
select the desired user in the “Remote users” folder.
2. Click the user with the right mouse button and select “Export User
Settings for NetWAYS/ISDN” in the context menu.
The dialog “Export VPN User Settings for NetWAYS/ISDN” ap-
pears.
3. In the “Password” field, enter a password that will be used to en-
crypt the export file. The VPN user will need to type in this pass-
word to import the configuration in NetWAYS/ISDN.
4. The export file is generated with the name “NETWAYS.EFF” in the
folder you specify in the “Folder” field.
5. Confirm your choices by clicking “OK”.
6. Copy the resulting NETWAYS.EFF file to a floppy disk.
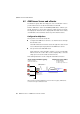
H Define a Route to the Virtual Private Network for the Lotus Domino
Server
The network settings of the Lotus Domino server need not contain a de-
fault gateway setting. If the AVM Access Server is not the default gate-
way, however, then the Lotus Domino server must be informed that IP
addresses in the VPN user group’s address range are reachable
through the AVM Access Server. In other words, a route to this address
block must be configured on the Lotus Domino server.
If the Lotus Domino server is running on a Windows operating system,
proceed as described below. The procedure for other operating sys-
tems (such as SunOS) is similar. Consult the documentation of your op-
erating system to see how to define local routes.
1. Open a command prompt on the Lotus Domino server computer.
2. Enter the following command:
route add 192.168.100.0 mask 255.255.255.0
192.168.10.1 metric 1 -p