
Specifications


Step by Step
AVM Access Server – 4 AVM Access Server Use Scenarios 49
E Create a Schedule and Activate it in the Remote Network Configuration
In order to allow use of the connection only during business hours,
from Monday through Friday between 9:00 a.m. and 5:00 p.m., you
must define a schedule and activate it in the settings for the remote
network.
1. Click with the right mouse button on the folder “Administration /
Schedules”, and select “Add Schedule...” in the context menu.
2. On the “General” dialog page, enter a name for the schedule.
3. Make sure the options “Treat holidays the same as Sundays” and
“Access enabled” are activated.
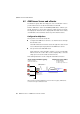
4. Now you can begin to create the schedule using the graphic tool.
– Click with the mouse at the position for 9:00 a.m. on Monday,
and hold the mouse button pressed as you move the mouse
pointer down and to the right.
– As you move the mouse pointer, a tool tip displays the day of
the week and the time of day corresponding to the currrent
position.
– In this way, draw a rectangle enclosing the area from “Mon
9:00” to “Fri 17:00”. Then release the mouse button.
5. Now return to the newly defined network in the “Remote net-
works” folder.
6. In the “Schedule” field on the “General” dialog page, select the
schedule you just defined.
7. Then click “Apply” to activate all of the new settings in the AVM
Access Server configuration.
F Test the Connection
1. Select the command “Monitoring” in the “View” menu.
2. Select the “Connection control” folder.
3. Click with the right mouse button on the new connection in the
list, then select the command “Test Connection” in the context
menu.
The AVM Access Server then runs the “ping” command with the
remote site’s IP address. The ping program’s output appears in a
DOS box. If the ping is successful, then the IP connection to the
remote AVM Access Server is functional.